
A solar power system can cost thousands, or even millions, of dollars. For homeowners, even a small rooftop solar setup represents a significant investment. Yet again and again, system failures trace back to a component that costs around $1.
Not the solar panels. Not the solar inverter. Not the batteries.
The failure starts at the MC4 connector. small, overlooked, and dangerously underestimated.
This post breaks down why cheap MC4 connectors are the weakest link in solar power systems, how cost-cutting multiplies risk, and what homeowners and engineers must do to prevent costly failures. Real-world statistics, case studies, and practical installation tips are included for both residential and industrial users.
What Is an MC4 Connector?
The MC4 connector is the standard electrical connector for connecting solar panels in PV systems.
- They handle high DC voltages (up to 1,500V) and currents while resisting heat, UV, dust, and rain.
- Ensure a reliable connection to your solar charge controller.
- Safely connect panels to your inverter and battery.
- Part of a complete solar panel kit that boosts efficiency and longevity.
Components of an MC4 Connector
Understanding the main components of an MC4 connector is crucial for proper installation, maintenance, and safety. Each part plays a specific role in ensuring reliable performance in solar PV systems.
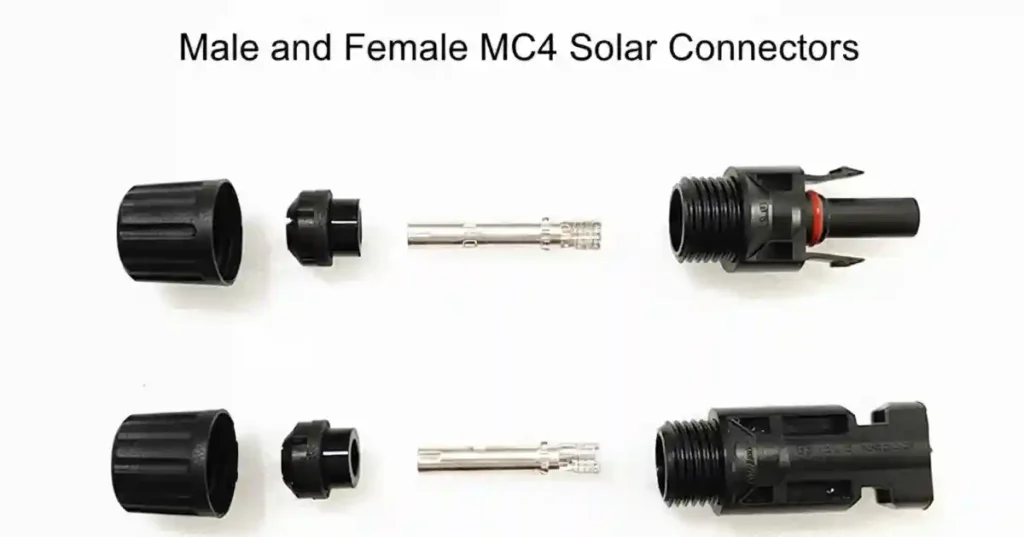
1. Male and Female Contacts
- These are the core conductive parts of the connector, responsible for safely carrying DC electricity from solar panels to the inverter.
- Material: Usually made from high-quality copper alloys with tin or silver plating for excellent conductivity and corrosion resistance.
- Function: Ensure minimal electrical resistance to prevent heat buildup or energy loss.
- Tip: Always inspect for oxidation or discoloration, which can indicate wear or poor connections.
2. Insulating Housing
- The insulating housing is the outer shell that surrounds the contacts.
- Material: Typically made from UV-resistant, weatherproof plastics.
- Function: Protects the metal contacts from environmental hazards like rain, dust, and UV radiation. It also prevents accidental short circuits by isolating live contacts.
- Pro Tip: Never force a connector into a damaged housing, as this compromises safety.
3. Locking Mechanism
- This is the clip or latch system that holds male and female connectors securely together.
- Function: Prevents accidental disconnection due to vibration, wind, or mechanical stress.
- Importance: A proper lock ensures continuous electrical flow and reduces the risk of sparking or arcing.
- Tip: Always hear or feel the “click” when connecting MC4 pairs to ensure full engagement.
4. Sealing Ring
- The sealing ring, usually made of silicone or rubber, fits around the contacts inside the housing.
- Function: Provides an IP67/IP68 waterproof seal to prevent water, dust, and moisture ingress.
- Importance: Protects connectors from corrosion, short circuits, and electrical faults in outdoor installations.
- Tip: Replace sealing rings if they appear cracked or hardened over time.
5. Crimped Cable Terminal
- The cable terminal is where the solar cable is physically attached to the contact.
- Function: Ensures a secure, low-resistance electrical connection between the cable and the contact.
- Installation: Must be crimped using manufacturer-recommended tools; improper crimping can lead to hot spots, arcing, or connector failure.
- Tip: Always verify the crimped terminal is fully inserted into the housing before locking.
Engineer Insight:
Even small mistakes in any one component — loose crimping, damaged seal, or partial locking — can compromise the entire solar system’s performance and safety. That’s why high-quality MC4 connectors and proper installation practices are non-negotiable for both residential and commercial solar systems.
A Brief History of the mc4 Electrical Connectors
The MC4 connector emerged in the early 2000s as solar energy systems demanded safer and easier-to-install DC connections.
- 2002–2005: These connectors gained international adoption thanks to weatherproofing (IP67/IP68) and user-friendly installation.
- 2010: IEC 62852 certification set a global safety standard for DC connectors in photovoltaic systems.
- 2015–2020: They became the de facto standard for residential, commercial, and industrial solar projects.
- Today: Manufacturers focus on higher-grade materials, UV-resistant housings, and compatibility with larger currents and voltages to future-proof solar installations.
Why MC4 Connectors Are Critical in Solar Systems
Every solar array relies on connectors to maintain a stable flow of electricity. Poor-quality or mismatched connectors introduce high-resistance points, generate heat, and can cause arc faults or fires.
Industry Insights & Verified Statistics
- PV system fires: Connectors are a major cause of PV fires. In Europe, studies show that DC connectors were implicated in around 24–27% of solar-related fires. (PVEL – Ultimate Safety Guide for Solar PV Connectors, 2022)
- System failures: Field inspections reveal that connector issues and poor crimping are responsible for a significant portion of PV system failures, with wiring and connectors being the number one cause of observed problems in large solar arrays. (Solar Power World – Wiring & Connectors, 2024)
- Energy losses: Misaligned or mismatched connectors in multi-panel systems can cause energy losses and hotspots, reducing overall system performance. About 40% of urgent safety issues in PV inspections were linked to connector failures. (Mayfield Renewables – Mitigating DC Connector Risks, 2024)
These numbers show that MC4 connectors are not just small accessories—they are critical safety and efficiency points in every solar system.
Engineer Insight: Always use connectors from the same brand and model in a single array. Mixing brands can cause subtle voltage mismatches, leading to hotspots and energy loss
How to Install MC4 Solar Connectors
Proper installation ensures safety, efficiency, and long-lasting performance:
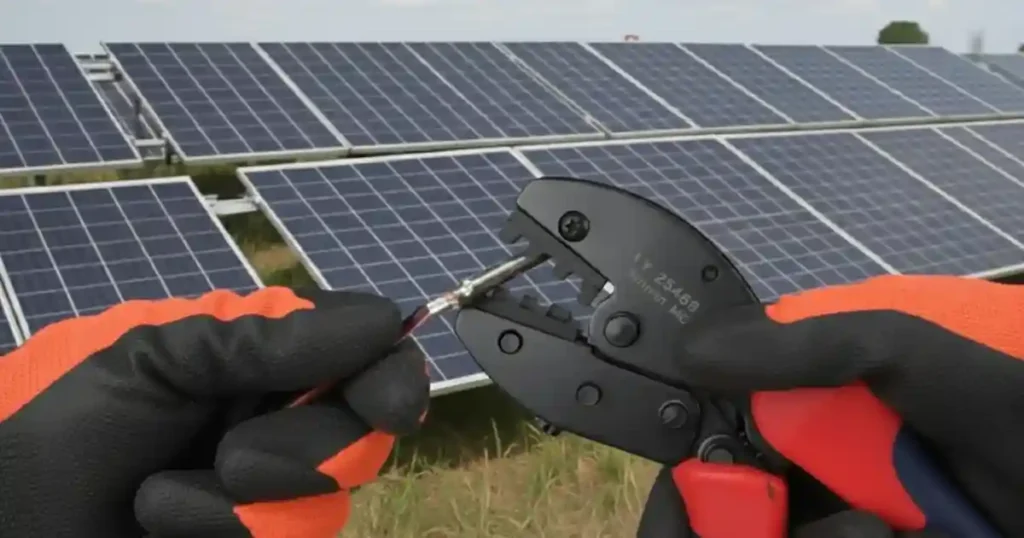
- Strip the Cable: Remove about 10–12mm of insulation from the cable end without damaging the copper strands.
- Crimp the Contact: Insert the stripped cable into the MC4 contact and crimp using the manufacturer’s recommended crimping tool. Avoid universal pliers.
- Insert Contact into Housing: Push the crimped contact fully into the plastic housing until it clicks.
- Engage the Locking Mechanism: Ensure male and female connectors are securely locked.
- Conduct a Pull Test: Gently pull the connectors apart to ensure proper seating.
- Check Polarity: Positive to positive (+) and negative to negative (−). Wrong connections can damage panels or inverters.
- Seal and Protect: Keep connectors free from moisture, dust, or debris. Use protective covers if available
⚠️ Warning
- Never Skip MC4 Connectors: Directly joining wires is extremely dangerous and can cause fires, short circuits, and inverter damage.
- Avoid Cheap or Non-Certified Connectors: Low-quality connectors are prone to overheating, arcing, and early failure.
- High Voltage & High Current Risk: MC4 connectors carry up to 1000–1500V DC and high string currents. Mishandling can cause electric shock, burns, or serious injury. Always de-energize the system before installation or maintenance.
- Do Not DIY Without Knowledge: Improper crimping or installation creates high-resistance points, leading to arc faults, energy loss, or component damage.
- Always Follow Polarity: Reversing positive and negative connections can permanently damage solar panels or inverters.
- Inspect Regularly: Check connectors at least once a year or after storms to prevent moisture ingress, corrosion, loose connections, or overheating.
MC4 Connector Sizes and Compatible Cable
Choosing the right MC4 connector size ensures safe and efficient solar power flow. Here’s a quick reference:
MC4 Connector Size Guide
| Connector | Cable Size | Max Current | Max Voltage |
|---|---|---|---|
| MC4 Small | 2.5 mm² | 20–25 A | 1000 V DC |
| MC4 Medium | 4 mm² | 30 A | 1000–1500 V DC |
| MC4 Large | 6 mm² | 35–40 A | 1500 V DC |
| MC4 XL | 10 mm² | 50 A | 1500 V DC |
Tip: Always match connector size with your cable and panel output. Correct sizing reduces resistance, heat buildup and ensures long-lasting performance.
How to Inspect MC4 Connectors
Regular inspection of MC4 connectors is critical for the safety, efficiency, and long-term reliability of your solar system, whether at home or in commercial arrays. Here’s how to do it properly:
1. Visual Inspection
- Look for discoloration, melting, or burning marks on the connector housing or contacts.
- Check for cracks, deformations, or UV damage in the insulating housing.
- Inspect the locking mechanism to ensure it fully engages and clicks into place.
- Examine sealing rings for cracks, hardening, or wear that could allow moisture ingress.
2. Physical Inspection
- Perform a gentle pull test to ensure male and female connectors are securely locked together.
- Check that the crimped cable terminal is firmly seated inside the housing without movement.
- Verify that cables are straight and free from nicks, abrasions, or mechanical stress at the connector point.
3. Electrical Inspection
- Use a multimeter to measure voltage continuity across the connector. Resistance should be minimal; high resistance indicates poor contact.
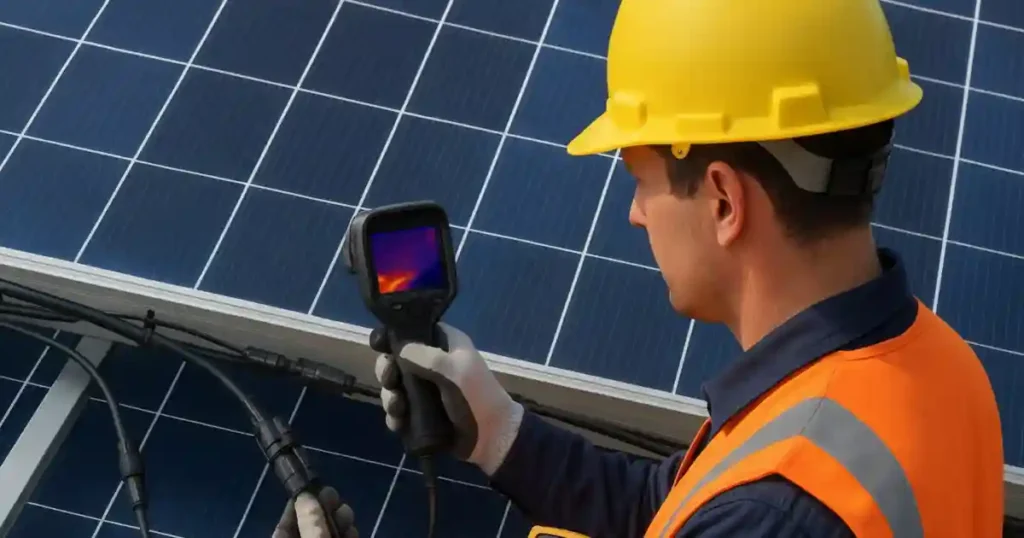
- Thermal Imaging (Thermal Camera):
- A thermal camera can detect hot spots caused by high-resistance connections.
- Hot spots may indicate poor crimping, corrosion, or mismatched connectors before they lead to energy loss or fire.
- Conduct scans under normal load conditions for accurate results.
4. Moisture and Corrosion Check
- Remove the connector (if safe) and look for any signs of corrosion on the contacts.
- Inspect for water or dust inside the connector housing, which can reduce conductivity and increase fire risk.
5. Routine Schedule
- Inspect at least once a year, or after extreme weather events such as storms, heavy rain, or heatwaves.
- In large or commercial solar arrays, more frequent inspections may be required to maintain safety and performance.
Engineer Insight:
Even high-quality MC4 connectors can fail prematurely if not inspected regularly. Small issues like loose locking, minor corrosion, partially crimped cables, or hot spots detected by thermal cameras can lead to energy loss, arc faults, or fires if ignored. Regular inspection ensures your system remains efficient, safe, and long-lasting.
Types of Solar Connectors
MC4 Connectors
Standard for modern solar PV systems, recommended for residential and industrial installations. Weatherproof, durable, and designed for high-voltage DC applications.
MC3 Connectors
Legacy connectors are used in older systems. Mostly phased out due to weaker locking mechanisms and lower current-handling capabilities.
Tyco Solarlok
Used in niche or older projects. Functional but requires careful handling and proper tools for safe operation.
Amphenol H4 Connectors
Industrial-grade connectors for specialized or large-scale commercial installations. High current capacity and durable locking mechanisms for harsh environments.
Pro Tip:
For multi-string or large-scale projects, always use uniform MC4 connectors across each array or string to ensure stable voltage, reduce hotspots, and simplify maintenance.
MC4 vs MC3 Connectors: Why Modern Solar Systems Depend on MC4
MC3 connectors were only rated for limited environmental protection and often suffered from water ingress, making them less reliable for long-term outdoor solar installations. MC4 connectors, on the other hand, offer IP67/IP68 protection, shielding against water, dust, and harmful UV radiation, making them ideal for modern solar systems.
Higher Voltage and Current Ratings
MC3 connectors typically support up to 600V DC and currents around 20–25A, limiting the scalability of solar arrays. MC4 connectors are rated for up to 1500V DC and currents of 30–40A, allowing larger strings, higher-power panels, and industrial applications while maintaining safety.
Improved Resistance and Heat Tolerance
MC4 connectors are designed with low electrical resistance, which reduces energy loss and prevents excessive heating under load. They can safely handle high DC currents for extended periods without degradation, making them long-lasting components that can last 25–30 years in properly installed solar systems.
Secure Locking Mechanism
MC3 relied on a simple snap-fit that could loosen under vibration or thermal cycling, increasing the risk of disconnection, hotspots, and arc faults. MC4 features a positive locking mechanism, keeping the connection secure and minimizing maintenance issues.
Ease of Installation
MC3 connectors often required extra effort and sometimes special tools. MC4 connectors are designed for quick and safe assembly using standardized crimping tools, reducing human error and installation time.
Global Standardization
MC4 has become the IEC 62852-certified global standard, ensuring brand compatibility, easier sourcing, and consistent safety compliance worldwide.
Engineer Insight: While MC3 connectors may still exist in older systems, all new solar installations now rely on MC4 connectors for safety, durability, future-proofing, and low-resistance, heat-tolerant performance. The combination of high voltage/current ratings, secure locking, and low resistance makes MC4 ideal for residential arrays (1–10 kW) and commercial/industrial setups (up to 100 kW and beyond).
MC4 Connector Types and MC4 Extension Cables
| MC4 Connector Type | Configuration | Typical Use Case | Where It Is Installed | Key Electrical Notes |
|---|---|---|---|---|
| Standard MC4 Male/Female | 1 to 1 | Panel to panel or panel to cable connection | At panel output leads and series string connections | Carries full string current and voltage up to 1000–1500V DC |
| MC4 Extension Connector | 1 to 1 with cable | Extending distance between panels and inverter | Between panel strings and inverter or combiner box | Must match cable size (4mm² or 6mm²) to avoid voltage drop |
| MC4 Y Branch Connector | 2 in 1 or 1 in 2 | Parallel connection of two panels or strings | Near panels or before combiner box | Increases current, voltage remains same. Fuse protection required |
| MC4 T Branch Connector | T shape | Compact parallel wiring in medium arrays | Rooftop arrays with limited space | Suitable for neat cable routing. Ensure equal string ratings |
| MC4 3 in 1 Branch | 3 parallel inputs | Small commercial or large home systems | String combining before inverter | High current handling. Use only with identical panel strings |
| MC4 4 in 1 Branch | 4 parallel inputs | High current string combining | Large rooftop or ground-mounted arrays | Requires inline fuses to prevent reverse current |
| MC4 Inline Fuse Connector | 1 to 1 with fuse | String level overcurrent protection | Installed in series with each string | Protects panels from backfeed currents in parallel arrays |
| MC4 Heavy Duty Connector | 1 to 1 | High current near inverter or combiner box | Near inverter DC input or combiner output | Thicker contacts and housing for thermal stability |
MC4 Connectors for Domestic/Home Solar Systems
Even small domestic solar installations rely on MC4 connectors to maintain a stable, safe electricity flow. Poor-quality or mismatched connectors create high-resistance points, generate heat, and can even start fires.
Homeowner Risks Include:
- Reduced Power Output: Low-quality or mismatched connectors can reduce home energy production by 5–15%
- Unexpected Maintenance Costs: Troubleshooting small connectors can cost hundreds of dollars in labor
Engineer Insight for Homes: Always use connectors from the same brand and model across your rooftop array. Avoid mixing brands—even in small domestic setups—to prevent voltage mismatches, hotspots, and energy loss.
Installation Tips for Domestic Users
- Choose Certified MC4 Connectors: Look for IEC 62852 or UL 6703 certification and IP67/IP68 ratings.
- Avoid Cheap Alternatives: A $1 connector may save a few dollars but can cause hundreds in repairs or losses.
- Uniform Connectors: Even in small arrays, using the same connector type across panels prevents hotspots.
- Professional Crimping Tools: If installing DIY, use manufacturer-recommended tools; improper crimping is a leading cause of failure.
- Annual Inspections: Check connectors after storms or extreme heat. Home systems may not have full-time monitoring, so visual checks are essential.
The $1 Illusion: Why Cheap MC4 Connectors Are Risky
Many procurement teams see MC4 connectors as low-cost accessories. Common assumptions include:
- “It’s just a connector.”
- “All MC4s look the same.”
- “Why pay more when this one costs $1?”
The reality: A high-quality MC4 connector carries the full string current, operates at 1000–1500V DC, and withstands heat, UV exposure, rain, dust, and vibration for decades. Cutting corners on connectors creates a dangerous mismatch between electrical stress and mechanical integrity, increasing the risk of system failures, energy loss, or even fires.
FAQs About Solar Panel Connectors MC4
Q1: Can I skip MC4 connectors and make a direct joint?
A: No. Direct joints are extremely unsafe, prone to resistance, moisture ingress, and code violations, and can cause fires or inverter damage.
Q2: How do I inspect MC4 connectors on my home solar system?
A: Perform visual, physical, and electrical inspections: check for discoloration, loose connections, moisture ingress, and conduct a pull test. Use a thermal camera to detect hot spots under load.
Q3: Can cheap MC4 connectors really cause fires?
A: Yes. Even low-voltage residential systems can generate enough heat at faulty connectors to start fires or damage equipment.
Q4: How often should I check connectors on a home solar array?
A: At least once a year or after extreme weather events like storms, heavy rain, or heatwaves.
Q5: What are the best MC4 connectors for domestic use?
A: Choose certified IEC 62852 connectors with IP67/IP68 protection, preferably from reputable brands.
Q6: Can I expand my home solar system with existing MC4 connectors?
A: Only if the connectors are rated for the additional current and compatible with the new panels. Otherwise, install new, certified connectors.
Q7: Are MC4 connectors necessary if I have only 1–2 panels at home?
A: Yes. Even small systems benefit from reliable connectors to prevent energy loss or safety hazards.
Q8: How long do MC4 connectors last in domestic setups?
A: With proper installation and maintenance, they can last 25–30 years.
Q9: Can MC4 connectors reduce household energy bills?
A: Indirectly, yes. Proper connectors ensure maximum energy flow from panels to the inverter, which helps your system perform efficiently.
Q10: Can I DIY install MC4 connectors on my rooftop?
A: Only if you have proper tools, training, and adhere to safety codes. Improper crimping or polarity reversal can cause arc faults or damage.
Q11: How can I detect connector problems before a failure?
A: Use a thermal imaging camera to scan connectors under load for hot spots, check for corrosion, and conduct resistance/continuity tests with a multimeter.
Q12: What safety precautions should I follow when handling MC4 connectors?
A: Always de-energize the system before working, never mix connector brands, follow polarity, avoid cheap or non-certified connectors, and inspect connectors regularly for wear, moisture, or damage.
Conclusion: Why MC4 Connectors Matter
The MC4 connector may be small but it is the backbone of your solar system’s safety and efficiency. Using certified connectors, proper installation, and regular inspection ensures your system stays safe and productive for decades.