A Complete, Practical, Homeowner-Friendly System Selection & Checklist Guide
Portable solar panel kits are perfect for emergencies, home, camping trips, tiny cabins, RV and Camper Vans or mobile setups. They provide backup power for essential devices without integrating with your home’s electrical meter system. Ready-made kits are available on the market, but building your own DIY portable kit allows you to tailor it to your needs, budget, and power requirements.
This guide walks you through estimating energy needs, selecting components, and assembling a fully functional 200 W portable solar panel kits, along with key safety considerations.
Difference Between Solar Panel Kits and Solar Power Systems
Important: It is crucial to understand that solar panel kits and full solar power systems are not the same. Kits are meant for portable, limited power applications, while solar power systems are designed for full-scale energy needs.
Solar Panel Kits:
- Pre-packaged set of components for easy installation and portability
- Typically includes panels, a charge controller, connecting cables, and mounting hardware
- Some kits include a small battery and a basic inverter
- Best for emergency or mobile backup
- Limited scalability
Solar Power System:
- Complete setup for generating, storing, and using solar electricity
- Includes panels, solar inverter, battery, wiring, and optional monitoring
- Scalable for homes, offices, or industrial applications
- Requires professional installation
- Designed for full home or facility power
Major Differences:
| Feature | Solar Panel Kits | Solar Power System |
|---|---|---|
| Purpose | Portable/emergency power | Full-scale home or business energy |
| Components | Panels, controller, basic wiring | Panels, inverter, battery, wiring, monitoring |
| Installation | DIY-friendly | Professional recommended |
| Scalability | Limited | Highly scalable |
| Energy Output | Low to moderate | Moderate to high |
| Cost | Lower | Higher |
⚠ Warning: Portable solar panel kits are not meant for powering full home appliances. Overloading may damage the system or create fire hazards.
Solar panel kits as a Camper Solar Panel Kit:
The 200 W solar panel kits size hits the sweet spot between portability, cost, and practical output. It is far more versatile than a 100 W panel but remains compact and manageable for transport.
Ideal Use Cases for 200 W Solar Panel Kits:
- RV and Camper Vans: A single 200W panel is often the minimum requirement to reliably recharge a 12V battery bank, ensuring power for interior lights, water pumps, and charging communication devices while on the road.
- Emergency Home Backup: In the event of a blackout, 200 W solar panel kits can be quickly set up to recharge a small power station or battery bank, keeping essential devices like phones, a WiFi router, or low-wattage medical equipment running.
- Off-Grid Cabins & Remote Living: Provide sufficient power for lighting, power tools, and small refrigerators during weekend use in remote locations, and can even power small solar water pumps for irrigation or drinking water.
- Camping/Overlanding: Allows for silent, fuel-free charging of all devices and running a small fan or portable cooler without relying on loud, fossil fuel generators.
Key Advantages of 200 W Solar Panel Kits
- Portability & Size: Many 200 W units are foldable (briefcase style) or flexible, making them easy to store under a seat or mount on a curved RV roof.
- Daily Energy Yield: A well-positioned 200 W panel can typically generate between 800 Wh and 1000 Wh (1 kWh) of electricity per day under good sunlight, which is substantial for essential loads.
- Balance of Cost & Power: It offers excellent value, providing significantly more power than smaller kits without the high cost and complex installation of permanent residential systems.
200 W Solar Panel Kit: Suitable for RV Solar Panel Kit – Step by Step Guide
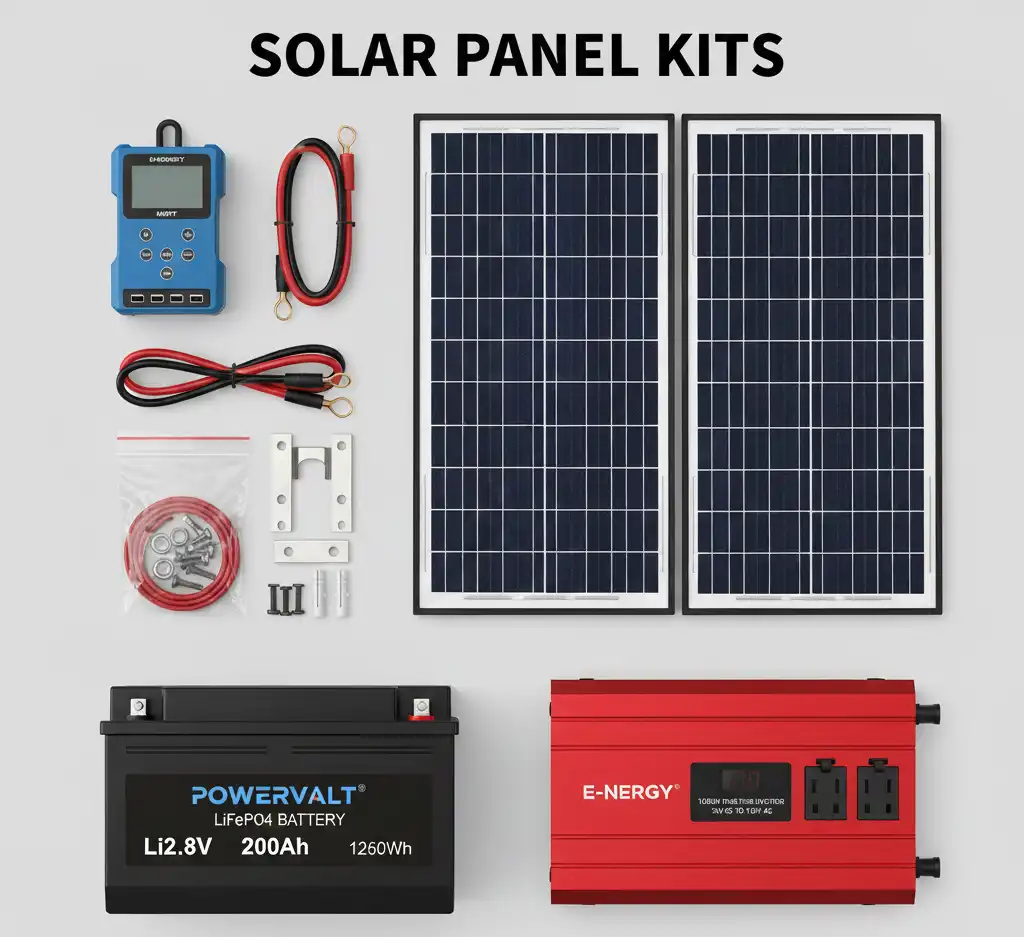
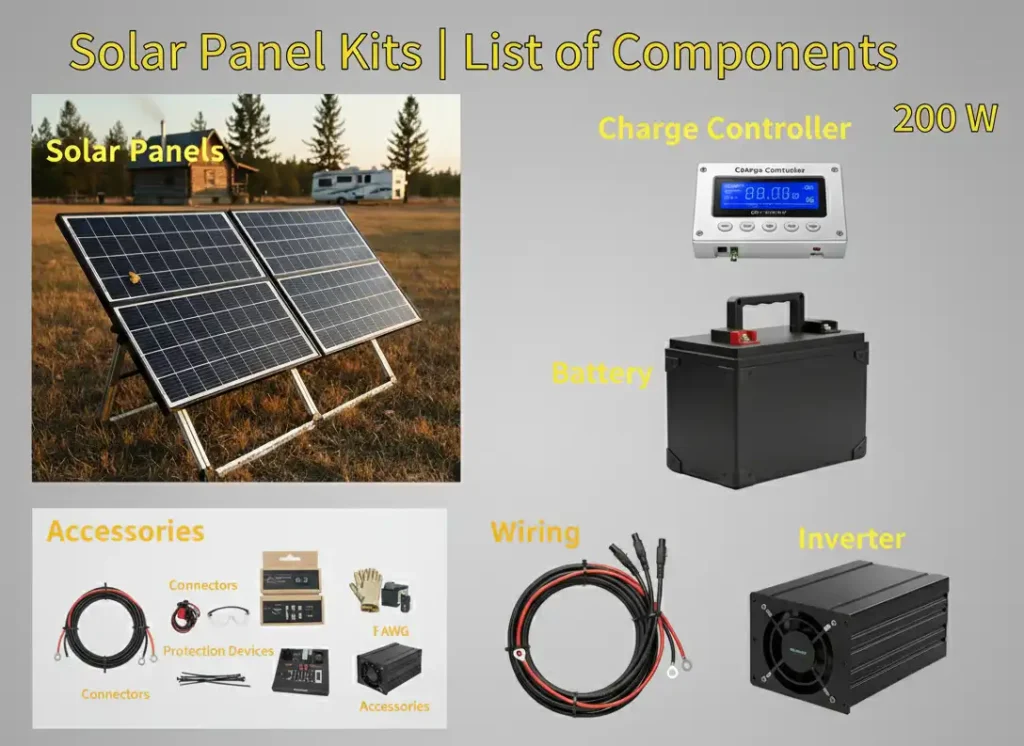
Components Needed for a 200 W RV Solar Panel Kit
Before starting, make sure you have all the necessary components for your portable solar kit:
- Solar Panels: 2 × 100 W panels or 1 × 200 W panel
- Charge Controller: MPPT recommended (15–20 A for 12 V system)
- Battery: Sealed LiFePO₄ (~1 kWh) or Lead-acid battery
- Inverter: Pure sine-wave inverter (capacity ≥ 20 % of peak load)
- Mounting System: Lightweight aluminum frame or foldable mount
- Wiring & Cables: UV-resistant wires of proper gauge
- Connectors: MC4 connectors, lugs, terminals
- Protection Devices: Fuses, breakers, DC/AC switches
- Accessories: Earthing rod, cable ties, insulation tape, PPE (gloves, safety glasses)
⚠ Note: Always check component ratings, weather resistance, and compatibility before use.
Calculate the devices you want to power:
Step 1: Define Your Load
| Device | Wattage | Daily Use (h) | Energy Needed (Wh) |
|---|---|---|---|
| LED Lights (4×10 W) | 40 W | 5 | 200 |
| Laptop | 50 W | 3 | 150 |
| Phone Charging (2 phones) | 10 W | 4 | 40 |
| Small Fan | 40 W | 4 | 160 |
Total Daily Energy: ~550 Wh
⚠ Warning: Never exceed the total rated capacity of your kit.
Step 2: Selecting the Solar Panel
Options:
- Monocrystalline panels: High efficiency, compact, more expensive
- Polycrystalline panels: Budget-friendly, slightly lower efficiency
- Flexible or foldable panels: Lightweight, ideal for RV or camper solar panel kits
Recommendation: Choose solar panels that provide slightly more than your calculated daily energy needs. For this example, two 100W panels or a single 200W panel work well.
💡 Engineer’s Pro-Tip: Save 50–70%
Utilize Tier-1 solar panels from decommissioned solar farms to reduce costs.
- The Value: A used 250W rigid panel often costs less ($40–$60) than a new 100W portable kit.
- Best For: Fixed RV mounts or ground setups (less ideal for folding/hand-carry).
- Note: Always perform a Vₒc / Iₛc test to verify efficiency (see our Used Solar Panels Buying Guide).
⚠ Warning: Always check the panel’s warranty and temperature tolerance. Avoid panels that are not weather-resistant for outdoor use.
Step 3: Selecting the Inverter
Key Types:
- Solar inverter: Converts DC to AC for appliances
- Power inverter: Provides pure AC output for sensitive electronics
Recommendation:
- Use a pure sine-wave power inverter for reliable operation.
- Select an inverter with at least 20 % higher capacity than your peak load.
- Ensure the inverter’s surge rating can handle the brief starting current of high-wattage motorized appliances (e.g., small fridges or power tools), which can surge 2–3 times their running watts.
- Check the AC standard (110 V or 220 V) before selecting the inverter.
Important Note:
Always check the AC output standard of the inverter, choose 110 V or 220 V depending on your region and the appliances you plan to power. Using the wrong voltage can damage devices or create safety hazards.
⚠ Warning: Using a lower-rated inverter can damage both the inverter and connected devices.
Step 4: Charge Controller Selection
Options:
- PWM (Pulse Width Modulation): Budget-friendly, simple
- MPPT (Maximum Power Point Tracking): High efficiency, expandable, ideal for 200 W or solar panel kits
Recommendation:
- Use MPPT for better efficiency
- For a 12 V, 200 W system, select a 15 A or 20 A rated MPPT charge controller
- Smart AI-Ready Controllers: These feature Bluetooth/Wi-Fi connectivity and allow for real-time data tracking and algorithmic optimization.
Recommendation: Use an MPPT Smart Controller for the best efficiency. In 2025, a “Smart” controller is no longer just a luxury; it is essential for protecting your battery and monitoring your system from your phone.
Pro Tip: The Future of Energy Management While a smart controller handles the current flow, you can now take your savings a step further by integrating your hardware with AI. Modern setups use Solar AI to lower monthly electricity bills by predicting weather patterns and managing your battery discharge during peak grid hours. This combination of “Smart Hardware” and “AI Software” can increase your total energy yield by up to 25%.
⚠ Warnings:
- Never connect panels directly to the battery without a controller
- Ensure proper voltage matching between panels, controller, and battery
Step 5: Battery Selection
Battery options:
- LiFePO₄ (Lithium Iron Phosphate): Long life, safe, maintenance-free
- Lead-acid: Cheaper upfront, requires regular maintenance
- Avoid liquid batteries for portable kits due to handling risks
Recommendation: Use a sealed LiFePO₄ battery (~1 kWh) for ~5 hours of backup at 200 W load, and consider its Depth of Discharge (DoD); LiFePO₄ is safe at 80–90%, while lead-acid is limited to 50%.
⚠ Warnings:
- Do not over-discharge or overcharge
- Proper ventilation for lithium batteries is critical
Step 6: Mounting System and Accessories
- Lightweight aluminum frames or foldable mounts for portability
- UV-resistant cables and waterproof connectors
- DC and AC breakers, fuses, and proper earthing
⚠ Warnings:
- Improper mounting can damage panels or cause electrical hazards
- Always follow manufacturer’s installation instructions
Step 7: Wiring & Cable Sizing (Crucial Safety)
- Use correct wire gauge for every connection
- Battery-to-Inverter wires must be the thickest in the system to handle high DC current
Recommended Wire Gauges for 12 V, 200 W Kit:
| Connection | Max Current (A) | Recommended Wire Gauge (AWG) | Notes |
|---|---|---|---|
| Solar Panel → Charge Controller | 10–15 | 12–14 | UV-resistant |
| Charge Controller → Battery | 15–20 | 10–12 | Include fuse |
| Battery → Inverter | 16–20 | 8–10 | Thickest wire in system |
| Inverter → AC Devices | As per inverter output | Follow AC rules | Check local standard |
Additional Tips:
- Keep wires tidy, insulated, and protected
- Use proper connectors; never twist wires directly
- Disconnect the battery before maintenance
- If unsure, seek assistance from a certified installer
Wiring Guide
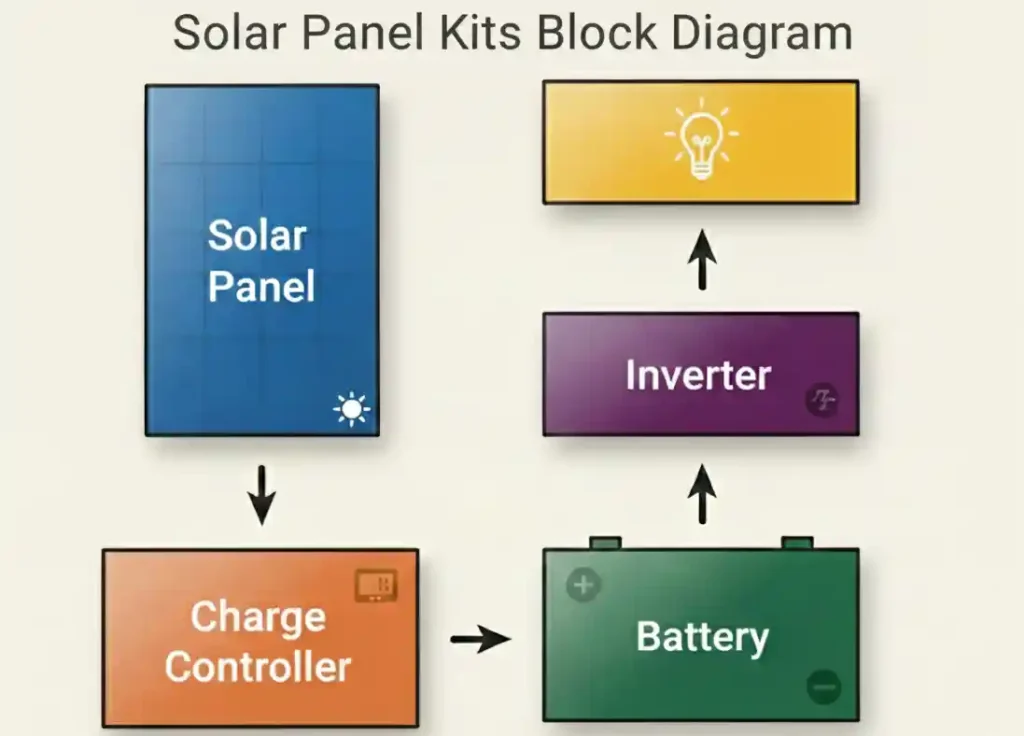
1. Connect Solar Panels to Charge Controller:
- Panels → MC4 connectors → MPPT Charge Controller input
- Ensure correct polarity (+ to +, – to –)
2. Connect Charge Controller to Battery:
- Charge controller output → Battery terminals
- Install fuse inline for protection
3. Connect Inverter to Battery:
- Battery → Inverter input
- Install breaker between battery and the inverter
- Use correct gauge cable
4. Connect Devices to Inverter:
- AC devices plug into inverter
- DC devices (like lights) can connect via charge controller if supported
⚠ Warnings:
- Always disconnect battery before maintenance
- Avoid short-circuits
- Keep wires tidy to prevent wear
- Ensure inverter ventilation
Safety & Warnings for Solar Panels Kits
| Category | Safety Rule | Description |
|---|---|---|
| Wiring Safety | Use Correct Wire Gauge & Recommended Connectors | Match wire size to system wattage to prevent overheating. Always use MC4 connectors, proper lugs, and terminals. Never twist wires or make direct joints. Tighten terminals and check polarity to avoid damage. |
| Protection Devices | Install Fuses & Breakers | Place fuses/breakers between panels and controller, battery and inverter, to prevent short-circuits. |
| Battery Safety | Keep Batteries Ventilated & Use Proper DoD | Avoid heat build-up. Do not overcharge or over-discharge; follow the recommended Depth of Discharge. |
| Inverter Safety | Keep Inverter Dry & Cool | Avoid dust, heat, and moisture for reliable operation. |
| Installation Safety | Disconnect Before Servicing & Proper Grounding | Always turn off the inverter and disconnect the battery before touching wiring. Ground the system correctly to prevent shocks. |
| PPE Safety | Use Personal Protective Equipment | Wear gloves, insulated tools, and safety glasses when handling panels, wires, and batteries. |
| General Safety | Regular Inspection & Keep Away from Children | Check wires, connectors, fuses, and batteries monthly. Keep the system out of reach of children. |
| Professional Assistance | Seek Help if Needed | If you face any difficulty, take assistance from a local certified installer. |
Direct DC Usage of Solar Panel Kits: Important Note
Many portable solar panel kits allow you to run DC devices (like DC fans, DC lights, or small DC home appliances) directly from the battery or charge controller. This has key advantages:
| Feature | DC Devices | Using AC via Inverter |
|---|---|---|
| Power Conversion | Direct from battery/charge controller | DC → AC conversion via inverter |
| Efficiency | High (no conversion losses) | Lower (inverter loses ~5–10% power) |
| Cost | Saves money (no inverter needed) | Requires purchasing inverter |
| Maintenance | Simple, fewer components | More components to maintain |
| Safety | Fewer points of failure | Slightly higher risk if inverter is faulty |
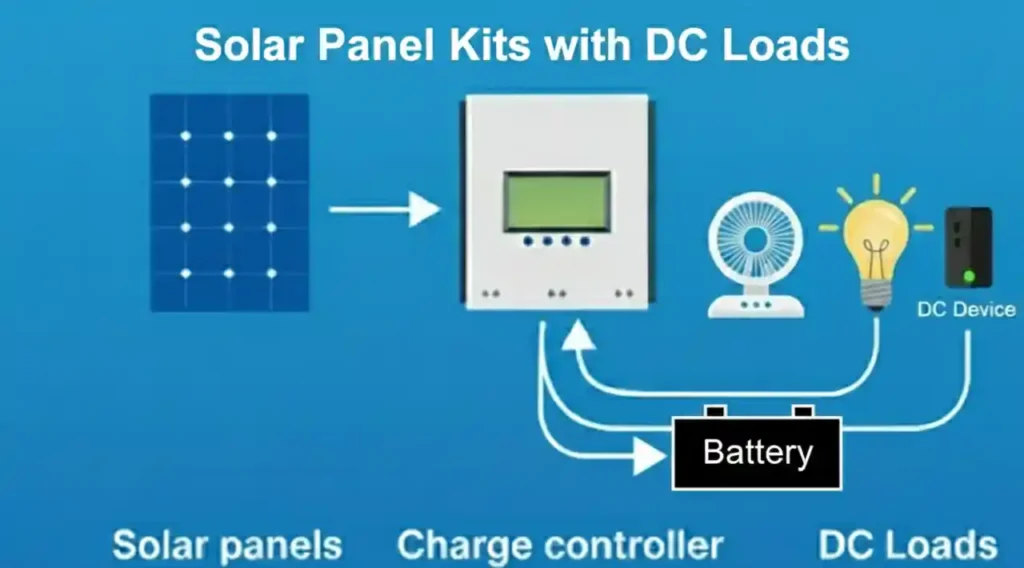
Key Takeaways:
- Running DC devices directly is more efficient and cost-effective.
- If most of your appliances are DC-compatible, a power inverter is not necessary.
- Always check device voltage and match it with battery/charge controller output.
- Never exceed the rated capacity of your battery or solar panel kit.
Maintenance & Care
- Clean solar panels regularly with a soft cloth or brush.
- Inspect cables, connectors, and mounting hardware periodically.
- Keep the inverter and battery ventilated.
- Replace any worn or damaged components promptly.
- Never overload the system; stay within the rated capacity of your solar panel kit.
Summary
Building a portable solar panel kit provides flexible, safe, and efficient power solutions. You can customize panels, batteries, and inverters to suit your needs, use recommended components for safety, and benefit from efficient MPPT controllers and pure sine-wave inverters. Compact and foldable designs make these kits ideal for emergencies, travel, camping, or off-grid setups
Frequently Asked Questions (FAQs)
What is included in a basic solar panel kit?
A basic kit usually includes solar panels, a charge controller, an inverter, wiring, mounting brackets, and a battery for storing energy.
How much power do I need from a solar panel kit?
It depends on your devices. Small loads like lights and phone chargers need a few hundred watts, while larger setups for home backup may require 500 W to 2 kW or more.
Is a 200 W solar panel kit enough?
A 200 W kit can power small loads like LED lights, phone charging, or a small fan. It’s ideal for camping, RVs, or emergency backup.
How long does it take for a 200 W kit to charge a battery?
In good sunlight, a 200 W panel can produce around 800–1000 Wh per day, enough to charge a 12 V 50–80 Ah battery depending on sun conditions.
Are solar panel kits safe to use?
Yes, they are safe if you follow precautions: use the correct fuse size, always use recommended connectors and terminals (never twist wires), keep batteries ventilated, and wear PPE when handling electrical components.
Can I upgrade a 200 W kit later?
Yes. Many kits allow expansion by adding panels, increasing battery capacity, or upgrading the inverter.
What size solar panel kit is best for home backup?
For reliable home backup, kits typically range from 500 W to 2 kW, depending on your appliances and daily energy usage.
Do all solar panel kits need batteries?
No. Off-grid kits require batteries to store power, whereas on-grid kits feed electricity directly to the home’s circuits via the inverter.
Can I install a solar panel kit myself?
Small kits are DIY-friendly. Larger systems may require a certified installer to ensure safe wiring, proper grounding, and correct load calculations.
How long do solar panels last?
Most high-quality panels last 20–25 years, gradually losing efficiency over time.
Do solar panel kits work on cloudy days?
Yes, but output is reduced—typically 10–30% of the panel’s rated capacity, depending on sunlight conditions.
What precautions should I follow when working with solar panel kits?
Always use PPE, ensure proper wiring and connectors, do not touch terminals with wet hands, and seek professional help if unsure.
What is the impact of “Voltage Drop” on a 12V solar kit?
Voltage drop caused by thin or long wires reduces charging efficiency. To ensure your battery receives full power, keep cable runs under 15 feet and use 10 AWG to 12 AWG UV-resistant wiring.
Can I mix different brands of solar panels in a kit?
Technically, electricity doesn’t care about the brand name on the frame, but it cares deeply about the electrical specifications. If you mix panels with different ratings, you risk losing a significant portion of the energy you paid for.
Pure Sine Wave vs. Modified Sine Wave: Which Inverter should I use in my kit?
You should always choose a Pure Sine Wave inverter. While Modified Sine Wave inverters are cheaper, they produce “blocky” electricity that can cause humming noises, overheating, or even permanent damage to sensitive electronics. A Pure Sine Wave inverter provides clean, smooth power identical to the utility grid, ensuring your laptops, medical devices (CPAP), and motors run safely and efficiently.