Wrong cap size is the #1 reason solar fence post lights fail early. Engineer’s guide to post sizing, lumen specs, IP ratings & install by material.
If you’ve spent any time picking out solar fence post lights, you already know the frustrating part — they’re sold by style, not by spec. You see a photo, maybe a lumen rating buried somewhere, and that’s it. There is no mention of the post size it actually fits, how the cap seals against rain, or what happens to the battery after two winters.
I’ve installed and tested enough of these to give you a direct answer: most solar fence cap lights work fine for the first season. The ones that hold up long-term are the ones spec’d correctly for your post and your climate. That’s what this guide covers.
1. What Actually Matters When Choosing Solar Fence Post Lights
Before getting into specific types, here are the specs worth paying attention to — and a few you can mostly ignore.
Post size compatibility is the first thing to verify. Solar cap lights sit on top of the post, and the base dimensions need to match. A cap designed for a 4×4 nominal post won’t sit flush on a 5×5, and a loose fit means water gets in. More on sizing in the section below.
Lumen output matters more than you’d expect for a decorative product. There’s a meaningful difference between 5 lumens (barely visible glow) and 30+ lumens (actually useful for path visibility at night). For pure decoration, 5–15 lumens is fine. For driveway posts or entry gates where visibility matters, aim for 20–50 lumens.
Battery capacity (mAh) determines how long the light runs after a cloudy day. Most cap lights use a NiMH or Li-ion cell in the 600–1200 mAh range. A 600 mAh cell on a 5-lumen LED will run 6–8 hours. That same cell driving a 30-lumen unit may cut out by 2 AM. Check this number against your expected runtime.
IP rating tells you the dust and water resistance level. For outdoor fence lights, you want at least IP44 (splash-resistant from any direction). IP65 is better — it handles direct rain and garden hose spray without issue. Anything lower than IP44 is a risk in any climate with real weather.
Panel size is often undersold in product listings. A tiny 2×2 cm panel won’t fully charge a 1200 mAh battery in one day, especially in fall and winter when sun hours drop. If the panel looks too small relative to the light, it probably is.
2. Post Size Guide: Which Cap Fits Which Post
This is the part most product listings skip. Here’s how it maps out:
| Post Size (Nominal) | Actual Post Dimension | Compatible Cap Size | Common Application |
| 2×2 | 1.5″ × 1.5″ | 2×2 cap | Pool fencing, light-duty borders |
| 4×4 | 3.5″ × 3.5″ | 4×4 cap — most common | Residential wood fences, decks |
| 5×5 | 4.5″ × 4.5″ | 5×5 cap | Heavy timber fences, entry posts |
| 6×6 | 5.5″ × 5.5″ | 6×6 cap | Large entry gates, structural posts |
| Round posts | Varies by diameter | Round-specific caps (measure OD) | Pool fencing, commercial, aluminum |
The nominal vs actual size issue catches people every time. A “4×4 post” is actually 3.5 inches square after milling. So a cap labeled for a 4×4 post should have an internal base dimension of approximately 3.5″×3.5″. Always check the cap’s internal dimension against your actual post measurement, not the nominal label.
Vinyl fence posts are slightly different — they’re hollow and the outer dimensions can vary by manufacturer. Measure yours before ordering. Most vinyl post caps are designed for the outer dimension (since they slip over rather than sit inside).
Aluminum fence posts follow similar logic. A 2×2 aluminum post typically has a 2″ outer dimension, so the cap needs to accommodate that precisely. These are common in pool fencing and commercial applications.
Engineer’s Note: Measure your post before ordering, not after. Use a tape measure across the post face — for round posts, measure the circumference and divide by π (3.1416) to get the outer diameter. A ¼” mismatch in cap sizing means the cap rocks under load and the seal fails within one season.
3. Types of Solar Fence Post Lights
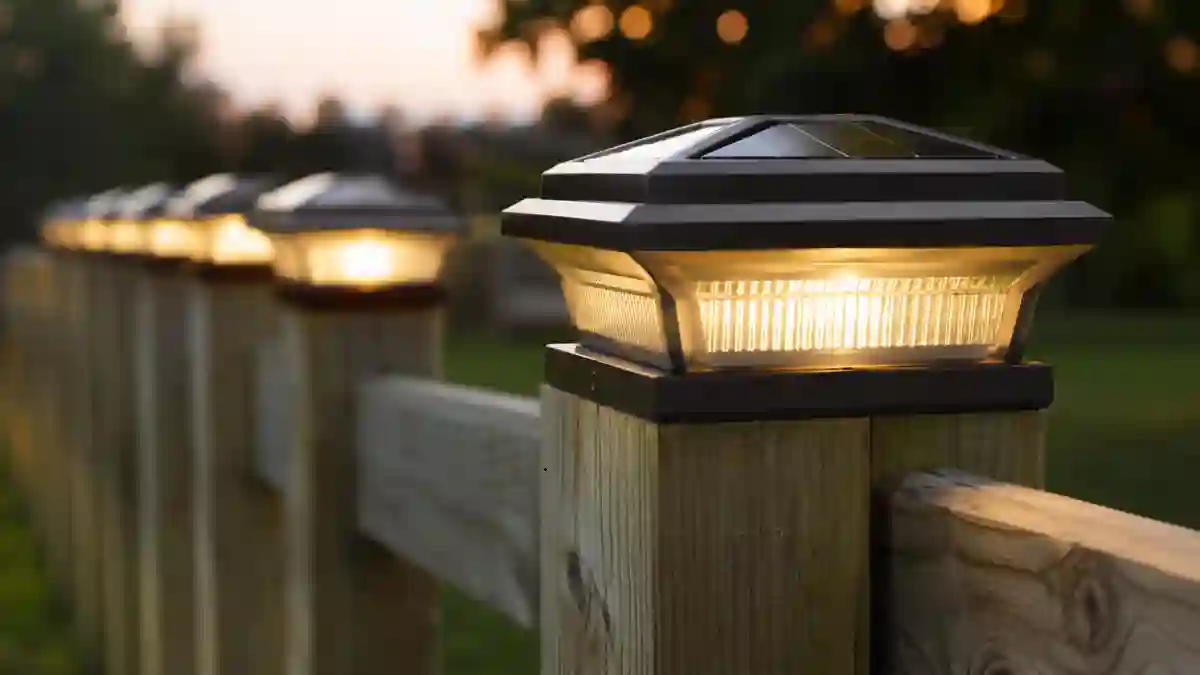
Flat Cap Lights
The most common type. A flat or slightly domed solar panel sits on top, LEDs point downward or outward through a frosted or clear lens. Simple, low-profile, and generally the most reliable because there are fewer moving parts and water has fewer ways to get in.
Best for: standard wood fence posts, driveway gates, basic perimeter lighting.
What to check: panel size relative to battery, IP rating, and whether the cap actually seals — look for a rubber gasket in the product photos.
Pyramid or Lantern-Style Caps
Taller profile with the solar panel on top and a lantern body below. These put out light in more directions and look better in certain landscaping contexts — entry posts, deck corners, garden borders.
The tradeoff is wind resistance. A taller cap on a post has more leverage working against it in high winds. If you’re in a consistently windy area, the flat cap style is more durable long-term.
Flickering Flame Style
These use an amber LED with a randomized flicker circuit to simulate a flame effect. Purely decorative — output is usually 5–10 lumens max. Fine for ambiance, not useful for visibility.
The flicker circuit draws slightly more power than a steady LED, so battery runtime per charge is shorter. Keep expectations realistic.
Motion-Sensor Post Caps
Some cap lights include a PIR motion sensor and step up to a higher brightness level when triggered, then dim back down. This is genuinely useful for driveway entry posts — you get ambient lighting at night and a brighter output when a vehicle or person approaches.
The engineering requirement here is a battery and panel sized to support both operating modes. If the product doesn’t specify its standby vs active lumen output and runtime at each level, that’s information the manufacturer is choosing not to publish.
4. Solar Lights for Round Fence Posts
Round post solar lights are less common but worth covering separately because the sizing question comes up often.
Round posts are typically described by their outer diameter: 3.5″, 4″, 4.5″, 5″ are the most common in residential fencing. The cap needs to match this outer diameter, and because round caps rely on friction fit or a set screw rather than a squared shoulder, the tolerance is tighter.
A cap designed for a 3.5″ diameter post will rock on a 4″ post. Small difference, real problem over time — water infiltration, rust on metal posts, wood rot on timber.
Field Note: I’ve seen this mismatch on jobs where the homeowner ordered caps online based on the listed “4 inch post” description without confirming whether that was a nominal or actual dimension. Two caps failed at the seal within one winter season. Cost to replace: minor. Annoyance: significant. Measure the actual post diameter before ordering.
5. Installation by Post Material
Installation is straightforward, but there are a few things worth doing correctly the first time.
| Material | Fit Method | Key Consideration | Install Note |
| Wood | Friction fit or side screw | Level post top, clean surface | Silicone bead under perimeter in windy areas |
| Vinyl | Slip-over outer dimension | Measure outer dim, not nominal | Allow 1–2mm clearance for thermal expansion |
| Aluminum | Slide-over with set screw | Lock with set screw — vibration loosens caps | Orient panel south before locking |
| Round timber | Friction or strap mount | Measure OD with tape + pi formula | Tight fit critical — gaps allow water infiltration |
Check post height and sun exposure before finalizing placement. If a tree or structure casts shade over certain posts for most of the day, those caps will underperform regardless of spec. The solar panel needs 4–6 hours of direct sunlight to fully charge. Partial shade significantly reduces that.
Orient the solar panel for maximum exposure. Most round and flat caps have a fixed panel position, but some pivot or allow a tilt adjustment. In the northern hemisphere, south-facing panels capture the most light. Even a 15–20 degree adjustment makes a measurable difference in charge time during winter months.
Engineer’s Note: Clean the post top surface before fitting the cap. Debris, old paint, or a rough cut creates gaps where water can sit. A flat, clean surface gives the cap its best mechanical seal and reduces long-term moisture ingress risk.
6. Lumen and Battery Sizing Quick Reference
| Application | Lumen Target | Battery (min) | IP Rating | Panel Size (approx.) |
| Pure decoration | 5–15 lm | 400 mAh | IP44 | 3×3 cm |
| Path / border visibility | 15–30 lm | 800 mAh | IP44–65 | 5×5 cm |
| Driveway entry posts | 30–60 lm | 1200 mAh | IP65 | 6×6 cm+ |
| Commercial / gate posts | 60–100 lm | 2000+ mAh | IP65 | Separate panel recommended |
For commercial gate posts or high-traffic entry points where 60–100 lumens isn’t enough, a dedicated small solar panel wired to a separate post-mounted fixture is a better engineering choice than a self-contained cap. The cap form factor limits panel area, which limits charge current, which limits how bright the light can run sustainably.
7. Expected Performance and Realistic Lifespan
Most solar fence post lights are spec’d to run 6–10 hours per full charge. In summer, with 6+ hours of good sunlight, that’s usually fine for overnight coverage. In winter, with shorter days and lower sun angle, some undersized units will only run 3–4 hours before dimming or switching off.
Battery degradation is the limiting factor for lifespan. NiMH batteries, which most budget caps use, typically handle 500–800 charge cycles before capacity drops noticeably. At one cycle per day, that’s 18 months to 2 years before you start seeing shortened runtime. Lithium-ion cells last longer (1000+ cycles) but are less common in low-cost cap lights.
If a cap light that worked fine last year is now going dark by midnight, it’s almost always the battery. Replacement cells for most cap lights cost very little, and most units can be opened and serviced — check if yours can before throwing it out.
Engineer’s Note: Panel efficiency loss is slow — typically 0.5–1% per year for quality panels. Battery capacity loss is the early failure mode. If a unit underperforms in year 2, replace the cell before replacing the fixture. Same result, lower cost.
8. Troubleshooting Common Issues
| Symptom | Likely Cause | Fix |
| No light at all after install | Pull tab not removed, or storage mode active | Remove battery pull tab. Hold button 3 sec to activate. |
| Runs 1–2 hours then cuts off | Battery deeply discharged from shipping | Leave in direct sun 2–3 full days before judging performance |
| Turns on during daylight | LDR (light sensor) blocked or failed | Cover panel 10 sec to reset. If persists, sensor is faulty — return unit. |
| Cap won’t sit flat | Post top uneven or has debris | Sand flat and clean surface. Belt sander pass on wood posts. |
| Water inside cap | Factory seal failed or missing | Silicone around base. If battery reached by water — replace cell. |
| Short runtime in winter | Reduced charge hours, panel angle too flat | Adjust panel tilt if possible. Accept reduced winter runtime as normal. |
Final Thoughts
Solar fence post lights are a low-complexity installation that most homeowners can handle without an electrician. The mistakes that cause early failures are almost always purchasing errors, not installation errors — wrong cap size, undersized battery for the lumen output, or inadequate IP rating for the climate.
Get those three parameters right before you buy, and most cap lights from established manufacturers will deliver two to three seasons of reliable service before the battery needs attention. After that, a $3 replacement cell typically restores full performance.
If you’re planning a larger solar lighting installation that goes beyond fence caps — pathway lights, garden accent lighting, or driveway markers — the solar garden and outdoor lights guide covers how to plan a complete layout without overcomplicating the system.
Frequently Asked Questions
Do solar fence post lights work in winter?
Yes, with reduced runtime. Shorter days and a lower sun angle mean the panel charges less per day. Most cap lights that run 8 hours in summer will run 4–5 hours in winter under the same conditions. This is normal, not a defect. If runtime drops below 3 hours in a location that gets adequate winter sun, the battery capacity is undersized for the light output.
What size cap fits a 4×4 fence post?
A cap labeled “4×4″ should have an internal base dimension of approximately 3.5″×3.5” — the actual milled dimension of a nominal 4×4 post. Don’t assume this. Check the manufacturer’s internal dimension spec before ordering. Some caps are designed for the nominal size and will be loose on the actual post.
How many lumens do I need for fence post lights?
For decoration only — 5 to 15 lumens is sufficient. For path or perimeter visibility — 15 to 30 lumens. For driveway entry posts where you want people and vehicles to clearly see the boundary — 30 to 60 lumens. Above 60 lumens, you’re moving into territory where a dedicated fixture rather than a cap light is a more practical solution.
Can solar post cap lights charge through clouds?
They can, but inefficiently. Overcast conditions reduce panel output to roughly 10–25% of clear-sky values. A cap light that takes 6 hours of full sun to charge will need 24–60 hours of overcast sky to reach the same state of charge. After a sustained cloudy period, expect 1–2 nights of reduced runtime before the battery recovers.
Are solar fence lights worth it compared to wired lights?
For most residential fence applications, yes. No trench digging, no electrical permit, no ongoing energy cost. The tradeoff is output — wired lights can be much brighter and run all night regardless of weather. If you need more than 60 lumens per post and consistent all-night runtime through winter, wired low-voltage landscape lighting is the better engineering choice. For decorative and light-duty visibility applications, solar cap lights are practical and cost-effective.
Related guides on SolarVisionAI.com
Solar Garden & Outdoor Lights: Types, Placement & What to Buy
MC4 Connectors: Solar Safety & Installation Guide
Solar Charge Controller: The Complete Guide