
The complete 2026 solar panel installation guide for homeowners. Learn how design, wiring, and AI optimization work from a Registered Professional Engineer.
I’ve been on rooftops in 115°F heat with a torque wrench in one hand and a single-line diagram in the other. I’ve watched utility meters spin backward for the first time and seen the look on a homeowner’s face when their first solar bill arrives. Trust me — that moment never gets old.
But I’ve also seen installations go wrong. Undersized wiring. Missing ground fault protection. Solar panels were installed at the wrong tilt angle for the latitude. Inverters nobody thought to ventilate. These are not theoretical problems. They are expensive, sometimes dangerous, and entirely preventable.
This guide is what I wish every US homeowner and property manager had before they signed a contract. It covers the full installation process the way engineers think about it — not in sales brochures, but in real sequence: site assessment, structural verification, mounting, wiring, inverter commissioning, and grid interconnection. By the end, you will know exactly what a qualified installer should be doing at every stage, and more importantly, what questions to ask when they are not.
Engineer’s Pro Tip: Bookmark this page. The NEC 2023 Article 690 governs solar PV installations in the US. Any installer who cannot reference it by name is one you should reconsider.
1. What Solar Panel Installation Step-by-Step Actually Involves
Most homeowners think of solar installation as putting panels on a roof and plugging them in. The reality is a multi-phase engineering process governed by the National Electrical Code (NEC), local building codes, utility interconnection agreements, and in many jurisdictions, structural engineering sign-off.

Here is the full installation process broken into its engineering phases:
- Site and structural assessment
- System design and permit application
- Roof preparation and mounting system installation
- Solar panel placement and mechanical fastening
- DC wiring, combiner boxes, and string configuration
- How AI Optimizes Solar Engineering
- Inverter installation and AC wiring
- Safety devices, disconnects, and metering
- Utility interconnection and Permission to Operate (PTO)
- Commissioning, monitoring setup, and system handover
Each phase builds on the last. Skipping or cutting corners on any of them — especially structural and electrical — creates liability, voids warranties, and in worst cases, creates fire hazards. Let me walk you through everyone.
2. Site Assessment: The Step Most Installers Rush
Before a single panel goes on your roof, a legitimate solar installer must conduct a proper site assessment. This is not a 10-minute visual inspection. Done correctly, it takes 1 to 2 hours and covers four distinct areas.
Roof Structural Analysis
Solar panels add a dead load of approximately 2.5 to 4 lbs per square foot to your roof structure. Most residential roofs in the US are designed to handle 20 to 30 lbs/sq ft of live and dead load combined, but that assumes the existing roofing material, rafter spacing, and decking are all in good condition.
A qualified installer checks rafter size and spacing, sheathing condition, and whether the structure can accept the additional concentrated point loads from mounting feet. For older homes, this may require a licensed structural engineer’s sign-off before permits are issued.
Engineer’s Pro Tip: In California and several other states, a structural letter from a PE is required for installations on roofs older than 15 years. Always ask your installer if your jurisdiction requires one.
Solar Resource Assessment
Panel orientation and tilt angle directly determine how much energy your system produces. In the continental US, south-facing panels at a tilt equal to your latitude — roughly 25° to 40° depending on location — deliver maximum annual yield.
Beyond orientation, your installer should run shading analysis using tools like Aurora Solar, PVWatts, or Helioscope. These tools model the sun’s path across every hour of every day and identify how trees, chimneys, vent pipes, or neighboring structures reduce output. A professional shading analysis is not optional — it is the foundation of an accurate production estimate.
Equally important is selecting the right solar panel technology, as different panel types respond differently to shading, temperature, and installation conditions. Modern systems typically use:
- Monocrystalline panels — the industry standard for high efficiency and long-term reliability
- TOPCon panels — advanced cell technology offering improved efficiency and lower degradation
- Bifacial panels — capable of generating additional energy from reflected light, increasing yield by 15–30% in optimized setups
Choosing the right panel type in combination with proper orientation and shading analysis can significantly impact real-world system performance — not just theoretical output.
Roof Condition and Age
If your roof is within 5 years of needing replacement, install a new roof first. Removing and reinstalling a solar array mid-life adds $1,500 to $4,000 in labor costs. Most installers will flag this, but not all of them will be honest about it if it delays a sale.
Electrical Service Assessment
Your installer evaluates your existing main panel — its amperage rating, available breaker slots, and whether it can accommodate the solar interconnection. The NEC 120% rule (Section 705.12) determines how much solar backfeed your panel can accept. A 200A panel rated at 200A may only accommodate up to 40A of additional solar backfeed without a main breaker upgrade or load center replacement.
3. System Design and Permitting
After the site assessment, your installer produces a system design package. This is the document that goes to your local Authority Having Jurisdiction (AHJ) — usually your city or county building department — along with your utility company.
What the Design Package Includes
- Site plan showing panel layout, roof dimensions, and setbacks
- Single-line electrical diagram (required by NEC Article 690)
- Equipment specifications: panels, inverter, racking, disconnect, metering
- String configuration: number of panels per string, voltage, and current calculations
- Structural attachment details for the mounting system
- Fire access pathways (required by IFC Section 605.11 in most jurisdictions)
The permit process in the US typically takes 1 to 6 weeks, depending on your jurisdiction. Some cities, like Los Angeles, have streamlined online permitting; others still require in-person submissions. Your installer handles this, but you should receive copies of everything.
Understanding Your System Size
| Home Profile | Avg Monthly Usage | Recommended System Size | Est. Annual Production |
| Small home, 1–2 people | 500–700 kWh | 4–5 kW | 5,200–6,500 kWh |
| Medium home, 2–4 people | 800–1,100 kWh | 6–8 kW | 7,800–10,400 kWh |
| Large home / EV owner | 1,200–1,800 kWh | 9–12 kW | 11,700–15,600 kWh |
| Large home + battery backup | 1,200–1,800 kWh | 10–14 kW + storage | 13,000–18,200 kWh |
These figures assume south-facing installation at an average US irradiance of 4.5 peak sun hours per day. Your PVWatts estimate from the site assessment will refine this.
4. Solar Panel Mounting Systems: What Goes on Your Roof Matters
The mounting system is the structural backbone of your solar installation. It is what keeps your panels on the roof in 90 mph wind events and 30-inch snow loads. It is also the component most frequently compromised by installers trying to cut costs.
Railed vs. Rail-Less Systems
Railed systems use aluminum rails attached to the roof with lag bolts driven into rafters. Panels clip onto the rails. This is the most common residential approach, and when done correctly — lags into rafters with proper flashing — it is structurally solid and allows future panel replacement without disturbing roof penetrations.
Rail-less systems attach mounting hardware directly to each panel’s frame without rails. They use fewer penetrations and are faster to install, but require precise rafter location for every attachment point. When done sloppily, this approach creates more potential leak points, not fewer.
Roof Penetrations and Waterproofing
Every lag bolt into your roof is a potential water entry point. Quality installers use purpose-built flashing assemblies — not just silicone sealant. The standard in the US is an Oatey-style or proprietary flashing that seals the penetration with a lead or EPDM boot and slides under existing shingles. Sealant-only installations on sloped roofs are a red flag.
Flat Roof Installations
For commercial or residential flat roofs, ballasted systems — where weighted blocks hold down a tilted racking frame — are common because they avoid roof penetrations entirely. The tradeoff is a significant additional roof load, typically 5 to 10 lbs/sq ft. A structural analysis is mandatory before any ballasted system is specified.
Engineer’s Pro Tip: Always ask to see the torque specifications for the lag bolts used in your installation. NEC and most racking manufacturers specify 40–50 ft-lbs for 5/16″ lag screws into rafters. Under-torqued lags will loosen over time.
5. The 2026 Shift: How AI Optimizes Solar Engineering
In the early days of the industry, a site assessment relied on a ladder, a compass, and manual “best-guess” calculations. In 2026, the industry has transitioned to Predictive Engineering. High-level solar design now integrates Artificial Intelligence into the planning phase to resolve technical bottlenecks before a single rail is bolted to the roof.
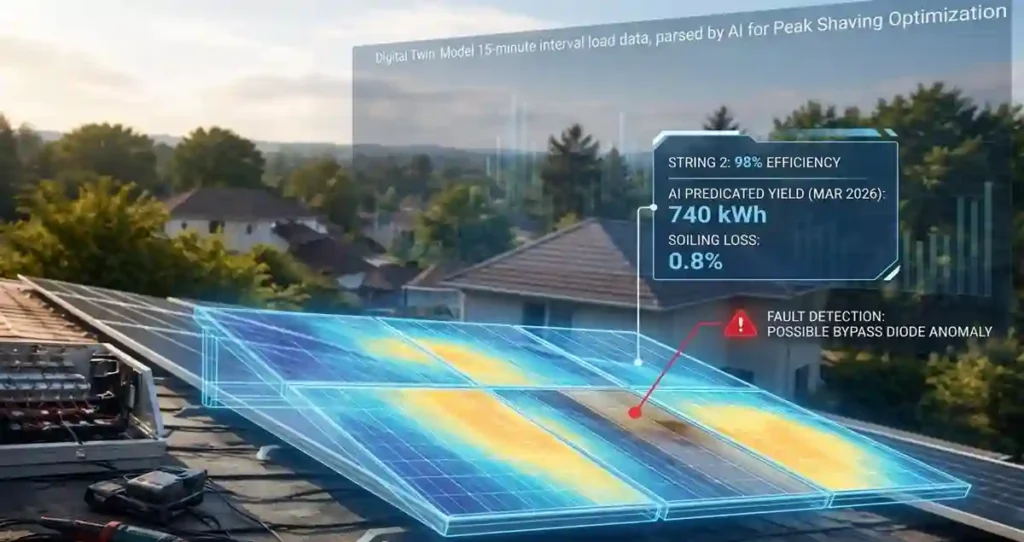
Here is how AI is fundamentally changing the accuracy and ROI of modern installations:
High-Precision Structural & Solar Modeling
Traditional manual surveys often miss “micro-details” that impact long-term yield. AI utilizes Computer Vision and LiDAR (Light Detection and Ranging) data to create a high-fidelity 3D digital twin of a property.
- Shading Accuracy: Rather than a static snapshot, AI simulates the sun’s path for all 8,760 hours of the year. Advanced models can even project tree growth over a 10-year horizon, ensuring panels do not end up in a “dead zone” by 2030.
- Generative Design: Design algorithms can iterate through thousands of string configurations in seconds. This identifies the specific layout that maximizes yield (kilowatt-hours per kilowatt-peak) while strictly adhering to NEC 2023/2026 fire setbacks and structural load limits.
Dynamic Financial & Load Profiling
Reliable engineering requires more than “average” electricity bill estimates. AI-driven modeling provides a data-backed financial forecast.
- Interval Data Analysis: AI parses “Green Button” utility data to identify exact peak demand periods. This allows for “Peak Shaving” strategies where Battery Energy Storage System or panel orientation is optimized to offset the most expensive kilowatt-hours.
- Inverter Clipping Optimization: AI calculates the ideal DC-to-AC ratio by modeling local ambient temperatures and historical irradiance. This ensures the system isn’t burdened by an oversized inverter that never reaches full capacity, nor losing significant energy to “clipping” on peak summer days.
Proactive (Not Reactive) Maintenance
The “Performance Gap” is the difference between modeled output and actual utility meter readings. AI bridges this gap through continuous verification.
- Anomaly Detection: Modern AI monitoring compares real-time production against a Digital Twin simulated for current local weather conditions. If production is even 7% lower than the model predicts, the system can distinguish between simple soiling (dust) and a technical fault, such as a failing bypass diode or a micro-crack in a specific module.
Engineer’s Pro Tip: Don’t settle for a “standard” layout. Ask your installer if they utilize Generative Design tools. An AI-optimized layout can frequently extract 5–10% more energy from the same roof footprint simply by optimizing string paths and calculating precise tilt-offsets.
6. DC Wiring: Where Electrical Safety Begins
Once panels are mounted, the wiring work begins, and this is where the electrical engineering matters most. Solar PV systems operate at high DC voltages. A standard residential string of 10 panels can reach 400 to 500V DC open-circuit. At these voltages, arc faults do not self-extinguish the way low-voltage DC does. They sustain and cause fires.
String Configuration
Panels are wired in series to build voltage, and strings are wired in parallel to build current. Your installer’s string design must stay within the inverter’s MPPT input voltage window — typically 200V to 500V DC for string inverters — under both minimum temperature (highest voltage) and maximum temperature (lowest voltage) conditions.
This is NEC 690.7 territory. An installer who configures strings without checking Voc temperature coefficients is creating an overvoltage condition waiting to happen.
Wiring Standards
- All DC wiring must use listed PV wire (USE-2 or PV-rated) rated for outdoor use and UV exposure
- Conduit is required wherever wiring passes through attic spaces or building interiors (NEC 690.31)
- MC4 connectors must be mated from the same manufacturer to maintain the IP67 waterproofing rating
- Wire management must prevent chafing, pinching, and contact with roof surfaces
Rapid Shutdown (NEC 690.12)
Since the 2017 NEC, all new residential solar installations in the US must include rapid shutdown — a system that de-energizes the roof wiring to below 30V within 30 seconds of a firefighter activating the emergency shutoff. This protects first responders. Module-level power electronics (MLPEs) — optimizers or microinverters — satisfy this requirement inherently. String inverter systems require a separate rapid shutdown device.
If an installer quotes you a string inverter system without rapid shutdown on a residential roof, they are either non-compliant or planning to file for a jurisdictional exemption. Ask directly.
7. Inverter Types and Installation
The inverter is the brain of your solar power system. It converts the DC power from your panels into the 240V AC your home uses, manages grid interaction, and, in modern systems, handles monitoring, safety, and sometimes batteries integration.
| Inverter Type | Best For | Rapid Shutdown | Monitoring Level | Rough Cost |
| String inverter | Simple roofs, no shade | Requires add-on device | System-level | $1,000–$2,500 |
| String + optimizers | Partial shade, mixed orientations | Built-in via optimizers | Panel-level | $1,500–$3,500 |
| Microinverters | Complex roofs, max monitoring | Built-in | Panel-level | $2,000–$5,000 |
| Hybrid / battery-ready | Backup power, future storage | Built-in | Panel-level | $2,500–$6,000 |
For most US homes without significant shading, a string inverter with power optimizers — the SolarEdge model — offers the best balance of cost, monitoring capability, and compliance. For complex roofs or maximum monitoring detail, Enphase microinverters are the industry benchmark.
Inverter Placement and Ventilation
Inverters generate heat and must be installed in ventilated spaces away from direct sunlight. An inverter in a south-facing garage bay exposed to afternoon sun will throttle output — a phenomenon called thermal derating — reducing your system’s performance by 5 to 15% on hot days. This is not a failure. It is physics. But your installer should account for it in their yield projections.
8. AC Wiring, Disconnects, and Utility Metering
From the inverter, AC wiring runs to your main service panel or a dedicated sub-panel, depending on system size and available breaker slots. This is governed by NEC Article 705 (Interconnected Electric Power Production Sources).
The NEC 120% Rule
The 120% rule determines how much solar your existing panel can absorb. The formula is: (Panel Ampacity × 1.2) − Main Breaker Rating = Maximum Solar Backfeed Amps. For a 200A panel with a 200A main breaker: (200 × 1.2) − 200 = 40A maximum solar backfeed, which supports roughly a 9.6 kW system at 240V.
If your system exceeds this, your installer has two compliant options: a main breaker downgrade (replacing the 200A main with a 175A breaker, freeing up more backfeed capacity) or a panel upgrade. Either approach has cost and permit implications.
Net Metering and Utility Interconnection
Once the installation passes building inspection, your utility company sends a technician to install a bidirectional (net metering) meter and issue a Permission to Operate (PTO). This is the legal “green light” — only after receiving PTO can the system be energized and start feeding power back to the grid.
PTO timelines vary significantly. In states with strong solar policy — California, New Jersey, Massachusetts — utilities typically process within 1 to 4 weeks. In less solar-forward states, it can stretch to 8 to 12 weeks. Your installer should manage this process, but track it yourself.
9. US Solar Incentives That Directly Affect Your Installation Decision
| Incentive | What It Covers | Value (2026) | Who Qualifies |
| Federal ITC (Investment Tax Credit) | 30% of the total installed system cost | 30% of the system cost | US homeowners, tax liability required |
| Net Metering | Credits for excess energy exported to the grid | Varies by state/utility | Most US states with solar |
| State Tax Credits | Additional state-level deductions | $500–$5,000 depending on state | Varies by state |
| SREC Markets | Sell solar renewable energy certificates | $10–$300 per MWh | NJ, MA, PA, MD, DC, OH, IL |
| USDA REAP Grant | Rural energy efficiency and solar grants | Up to 50% of the project cost | Rural small businesses |
Engineer’s Pro Tip: The 30% federal ITC applies to the full installed cost — panels, inverter, racking, wiring, permit fees, and battery storage if installed simultaneously. Keep every receipt. Your tax professional needs them.
10. How Long Does Solar Panel Installation Take?
The physical installation of a typical 6 to 10 kW residential system takes 1 to 3 days of crew time. But the full timeline from signed contract to energized system is longer:
| Phase | Typical Duration | Who Drives It |
| Site assessment and system design | 1–2 weeks | Your installer |
| Permit application and approval | 1–6 weeks | AHJ (local government) |
| Physical installation (on-site) | 1–3 days | Installation crew |
| Utility inspection and PTO | 1–8 weeks | Your utility company |
| Total: Contract to energized system | 6–16 weeks | All parties |
Delays almost always happen at the permit and PTO stages, not the installation itself. Ask your installer for their average permit-to-PTO timeline in your specific utility territory. This tells you a lot about their experience in your market.
11. Choosing a Qualified Solar Installer: What to Look For
The US solar industry is largely unregulated at the federal level. Anyone can incorporate a solar company and start selling systems. This makes installer selection one of the most consequential decisions you will make.
Non-Negotiable Qualifications
- NABCEP (North American Board of Certified Energy Practitioners) certification — the gold standard for solar installers in the US
- State contractor’s license with electrical endorsement
- General liability insurance ($1M minimum) and workers’ compensation
- Verifiable permit history in your jurisdiction — ask for permit numbers and look them up
Questions to Ask Before Signing
- Who will be on my roof? Is the work done by employees or subcontractors?
- Can you provide the permit application before I sign the contract?
- What is your average timeline from permit submission to PTO in this utility territory?
- What rapid shutdown method does this design use, and where is it specified in the plans?
- How do you waterproof roof penetrations — flashing assembly or sealant?
- What monitoring platform do you install, and who owns the data?
Field Note: I have reviewed dozens of solar proposals for homeowners. The single most common problem is installers overselling production estimates by using best-case irradiance data without accounting for local shading, soiling, or inverter clipping. Always ask for the PVWatts simulation report, not just a sales slide with a number on it.
12. System Commissioning and Monitoring
Once the utility issues PTO, your installer should run a formal commissioning procedure before handing the system over. This is not just flipping a switch.
What Commissioning Includes
- Verification of all torque values on mechanical connections
- Insulation resistance test on DC strings (IR test, documented)
- Verification of string Voc against design values
- Inverter startup sequence and MPPT lock confirmation
- Monitoring platform setup and data verification
- Emergency shutdown test (rapid shutdown device or microinverter disconnect)
- Homeowner walkthrough: monitoring app, emergency shutdown location, maintenance schedule
Request a written commissioning report. Any installer who does not produce one is not following industry best practice.
Monitoring Your System
Modern inverters from SolarEdge, Enphase, SMA, and Fronius all include cloud monitoring accessible via smartphone app. After commissioning, track your system’s daily production for the first 30 days and compare it against the installer’s production estimate.
What you are looking for: consistent day-over-day production on clear days, no string-level outliers, and inverter efficiency above 96%. If you see a panel consistently producing 15 to 20% below its neighbors, that is a shading issue, a faulty connection, or a panel defect — each of which your monitoring system should flag automatically.
13. Solar Panel Installation Cost in the US (2026)
| System Size | Gross Cost (Before ITC) | After 30% Federal ITC | Estimated Annual Savings | Simple Payback |
| 4–5 kW | $12,000–$18,000 | $8,400–$12,600 | $800–$1,200 | 8–11 years |
| 6–8 kW | $18,000–$28,000 | $12,600–$19,600 | $1,200–$1,800 | 8–12 years |
| 9–12 kW | $27,000–$42,000 | $18,900–$29,400 | $1,800–$2,800 | 9–13 years |
| 10–14 kW + battery | $35,000–$60,000 | $24,500–$42,000 | $2,200–$3,500 | 10–14 years |
Payback periods vary significantly by electricity rate, net metering policy, and local solar resource. Homeowners in California, Hawaii, and the Northeast — where electricity costs exceed $0.18/kWh — see faster paybacks. Those in states with low electricity rates or limited net metering see longer ones.
Engineer’s Pro Tip: Get three quotes minimum. In competitive solar markets, quotes for the same system can vary by $5,000 to $10,000. The cheapest quote is rarely the best — look for the combination of NABCEP certification, transparent production estimates, and a commissioning protocol in writing.
14. Maintenance: What You Actually Need to Do
Solar panels are genuinely low-maintenance — but they are not zero-maintenance. Here is what a properly maintained system requires:
- Panel cleaning: Once or twice per year in most US climates. Dust, bird droppings, and pollen reduce output. A soft brush with deionized water is sufficient. Never use abrasive materials.
- Visual inspection: Annually, check for cracked glass, discolored cells (visible through glass as brown patches — a sign of cell degradation), and loose wiring at the combiner box or inverter.
- Monitoring review: Monthly, check your monitoring dashboard for underperforming strings or panels.
- Inverter service: String inverters typically need replacement every 10 to 15 years. Budget $1,500 to $3,000 for this. Microinverters and optimizers are rated for 25 years.
- Vegetation management: Trees grow. Recheck shading every 3 to 5 years and trim as needed.
Final Thoughts from the Field
Solar panel installation is not complicated — but it is detailed work that requires engineering judgment at every step. The difference between a system that performs at 98% of its modeled output for 25 years and one that develops problems in year three is almost entirely about the quality of the site assessment, the design, the installation workmanship, and the commissioning procedure.
The US solar market in 2026 is mature, competitive, and full of excellent installers. It is also full of firms that prioritize sales volume over installation quality. As a homeowner, your best protection is education — knowing what questions to ask, what documentation to request, and what a well-executed installation actually looks like.
I’ve written this guide as I would brief a client before commissioning their system: complete, honest, and built on the engineering principles that determine whether a solar installation is an asset or a liability. Use it well.
Frequently Asked Questions
How long does solar panel installation take?
Physical installation takes 1 to 3 days. The full process — from contract signing to Permission to Operate — typically takes 6 to 16 weeks, with permit approval and utility interconnection driving most of the timeline.
Do I need to reinforce my roof before installing solar panels?
Not always. Most US residential roofs built to the current code can handle the load of a standard solar installation. However, older homes, homes with damaged decking, or homes with unusually close rafter spacing may require structural reinforcement or a PE sign-off. A good installer will identify this during the site assessment.
What is the difference between a string inverter and microinverters?
A string inverter converts DC from a series of panels into AC at a single central point. Microinverters do this conversion at each panel individually. Microinverters cost more upfront but offer panel-level monitoring, better performance under partial shading, and built-in rapid shutdown compliance. For complex roofs, they are almost always worth the premium.
Can I install solar panels myself?
Technically possible in some jurisdictions, but I strongly advise against it. The high DC voltages involved are genuinely hazardous; the permit process in most US jurisdictions requires a licensed electrical contractor, and improperly installed systems void panel and inverter warranties. The cost savings are rarely worth the risk.
What happens during a power outage if I have solar?
Grid-tied solar systems automatically shut down during outages — this is a safety requirement called anti-islanding protection. Without a battery, your solar panels produce no power when the grid goes down, even on a sunny day. If outage protection matters to you, specify a hybrid inverter with battery storage in your system design.
How do I know if my solar installer is legitimate?
Verify their NABCEP certification at nabcep.org, check their state contractor license number with your state’s licensing board, confirm they pull permits (ask for permit numbers from a past installation in your area), and make sure they carry both general liability and workers’ compensation insurance. These are non-negotiable.