Solar panel mount brackets for RV, polo, and motorhome — Z-bracket installation, vibration-resistant fastening, platform compatibility matrix, and 12V off-grid system sizing.
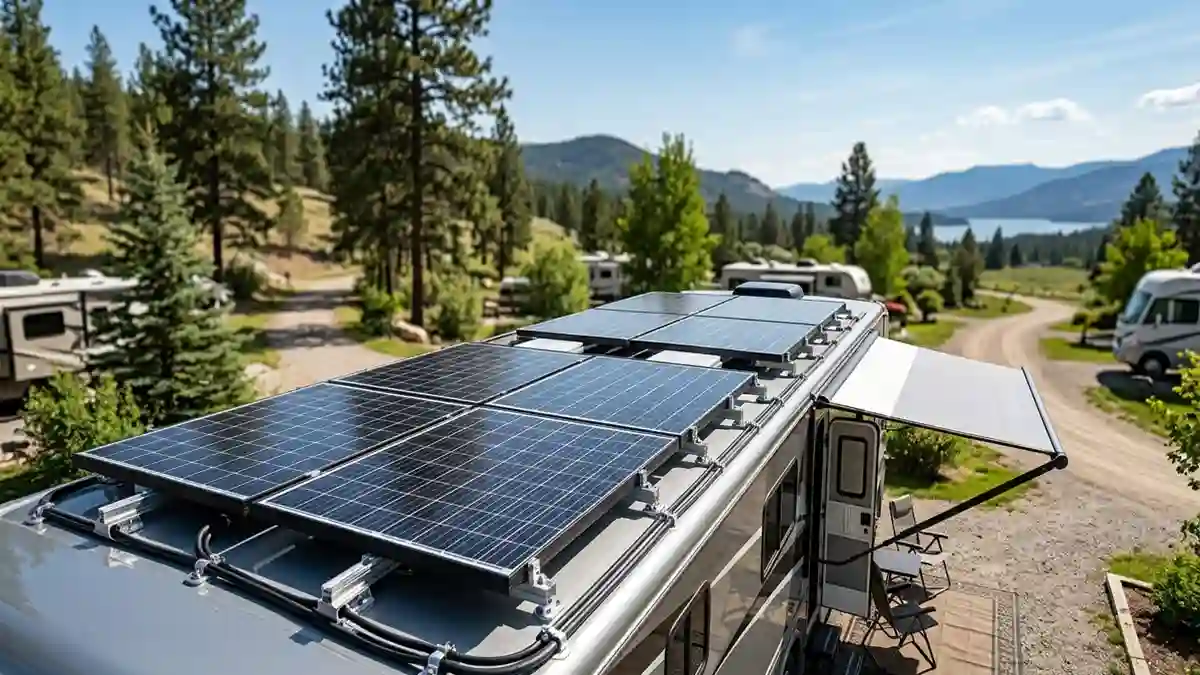
Installing solar panels on a mobile platform is a fundamentally different engineering problem from a building installation. The structure moves. It vibrates at multiple frequencies from the road surface, engine, and wind. It parks in different orientations relative to the sun every day. It has a roof that is typically aluminum or fiberglass — not a structural framing system designed to accept point loads from lag screws. And the electrical system it connects to is 12V or 24V DC — not the grid voltages covered in the fixed-installation posts in this cluster.
This guide covers the mobile-specific engineering of solar mounting. The fixed-installation bracket framework — structural load ratings, roof compatibility, and hardware specifications — is in the Solar Panel Mounting Brackets buying guide and the Mounting Brackets for Solar Panels guide. This guide addresses the variables that differ on mobile platforms: vibration loading, thin-skin attachment, and simplified DC electrical systems.
1. Solar Panel Mount Brackets for RV: The Structural Challenge
A conventional building roof is a static structure with defined framing members at known locations that can develop specific pull-out capacities from lag screws. A mobile vehicle roof is typically a thin aluminum or fiberglass skin over a structural frame — the skin itself has minimal structural capacity, and the underlying frame members may not be at convenient locations for bracket attachment.
The primary consequence: bracket attachment on mobile platforms must reach the structural frame — not the skin. On aluminum RV roofs, this typically means self-tapping screws into aluminum extrusion rails that run along the roof perimeter or at intervals across the roof. On fiberglass motorhome roofs, it means through-bolted connections that pass through the fiberglass skin and a backing plate on the interior surface.
2. Bracket Types for Solar Panel Mount Brackets for RV
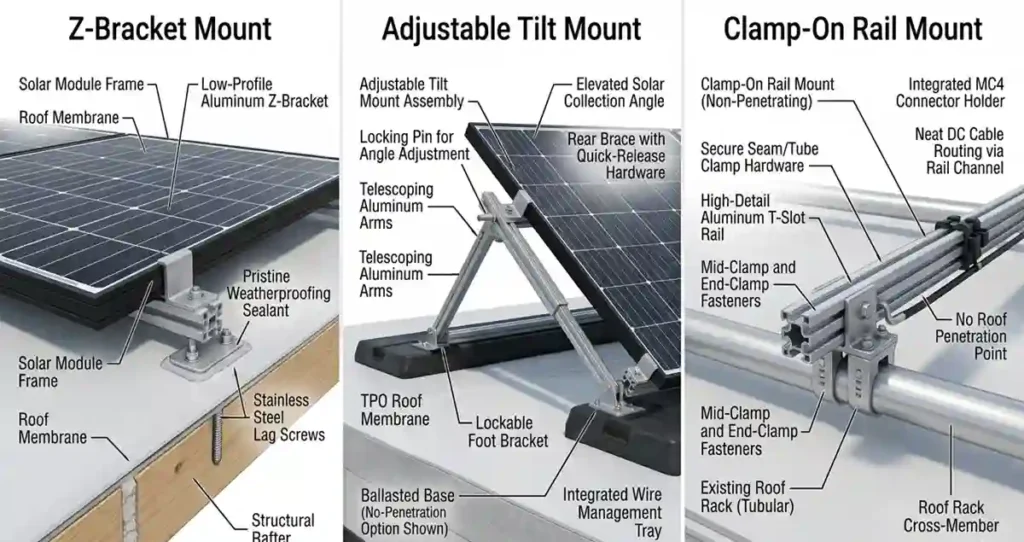
Z-Bracket (Flat Roof / Low Profile)
The standard bracket for flush-mount mobile solar. Four Z-brackets per panel — one near each corner — provide the attachment points to the roof surface. Z-bracket material must be aluminum or marine-grade stainless steel — not zinc die-cast or carbon steel. This is the same corrosion logic that makes 316 stainless the required specification for fixed-installation fasteners — described in the Solar Panel Mounting Brackets with Hardware guide.
Adjustable Tilt Mount
Tilt mounts allow the panel to be raised to a steeper angle when parked for improved solar capture. The tilt mechanism must lock securely at both the flat (travel) and tilted (harvest) positions — a bracket that can move during travel creates a vibrating load on the attachment points that rapidly fatigues the fasteners.
Clamp-On Rail Mount (RV-Specific)
Some RV manufacturers provide roof rails or ladder racks that can accept clamp-on solar bracket attachments without requiring any penetration of the roof membrane. Clamp-on systems are the preferred attachment method where roof penetration is not desired or where the manufacturer’s warranty prohibits non-factory roof penetrations.
3. Solar Panel Mount Brackets: Installation Requirements by Platform
| Platform | Roof Type | Preferred Bracket | Attachment Method | Sealing Requirement |
| Class A Motorhome | Fiberglass or ABS over frame | Z-bracket through-bolted | Through-bolt with aluminum backing plate inside; butyl tape at penetration | Dicor self-leveling sealant over all penetrations; interior backing plate sealed |
| Class B / C RV (van-based) | Steel vehicle roof | Z-bracket with self-tapping screw to roof rib | Stainless self-tapper into steel roof rib at known rib locations | VHB tape + Dicor at all penetrations; primer on steel before tape |
| Fifth wheel trailer | Aluminum skin over aluminum extrusion frame | Z-bracket screwed to extrusion rail | Locate extrusion rail with magnet; screw into rail web, not skin | Butyl tape under bracket base; sealant over screw heads |
| Polo / utility vehicle (steel frame) | Steel or aluminum sheet on steel tube frame | Weld-on or through-bolt bracket on frame | Weld to frame tube (best) or through-bolt through frame tube with backing plate | Not required — frame attachment does not penetrate weatherskin |
| Equestrian trailer | Aluminum skin, aluminum frame | Clamp-on to roof rail if available; Z-bracket if not | Clamp to existing roof rail; avoid skin penetration | No sealant needed on clamp-on; Dicor on any penetrations |
4. Vibration-Resistant Fastener Specification
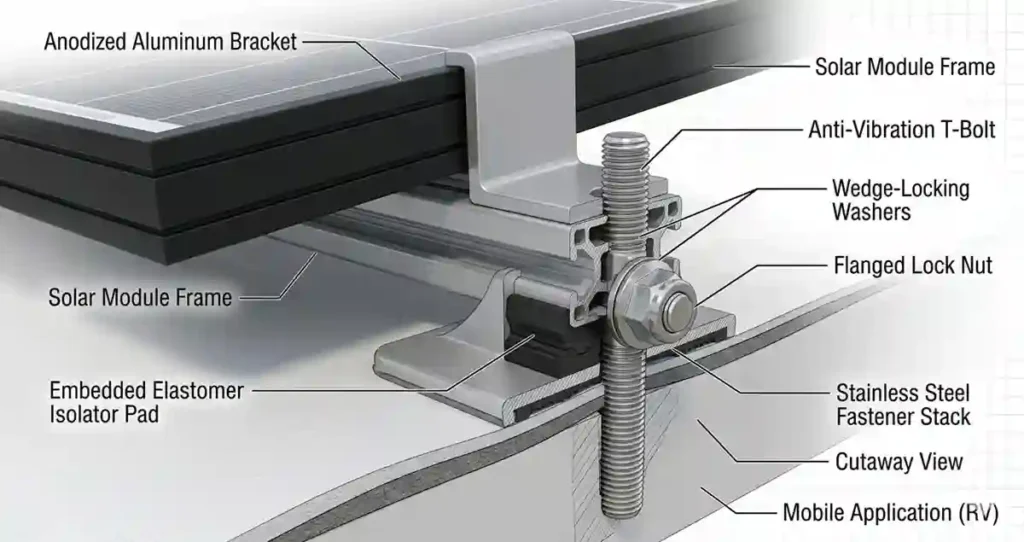
- Thread-lock compound (Loctite 243 or equivalent medium-strength) on all screws that thread into tapped holes in aluminum or steel. Without thread-lock, vibration loosens threaded connections in 500 to 2,000 road miles.
- Nylon-insert locknuts (Nylock) on all through-bolt connections — not standard hex nuts, which back off under vibration.
- Serrated flange bolts or lock washers as secondary vibration resistance on high-load attachment points.
- Check torque after the first 200 road miles following installation — vibration settles connections during the initial period, and torque commonly drops 20 to 30%.
Engineer’s Note: Some mobile solar installers use VHB (Very High Bond) adhesive tape as the primary attachment method. VHB 5952 has a tensile strength of approximately 90 psi. The primary limitation is temperature: VHB loses significant adhesion above 200°F, which is within the range of sun-baked metal roofs in summer in hot climates. I use VHB as a secondary seal and vibration damper, not as the sole structural attachment.
5. Electrical System Integration for Mobile Solar
Mobile solar systems operate at 12V or 24V DC — a fundamentally different electrical architecture from the grid-tied commercial systems covered elsewhere in this cluster. If you are sizing a fixed-building system or comparing inverter options for a grid-tied installation, the solar inverter selection guide on SolarVisionAI covers the grid-tied inverter types in detail.
- Panel to charge controller: DC wiring from the panel(s) to a solar charge controller (MPPT type recommended for efficiency above 100W system capacity). Wire sizing is critical at 12V — current is higher for the same wattage, which compounds resistance losses in long runs.
- Charge controller to battery: The charge controller manages the charge profile for the battery bank — typically lithium iron phosphate (LFP) or AGM lead-acid. LFP batteries follow the same chemistry as commercial battery storage systems, scaled down to mobile capacities.
- Battery to inverter (if AC loads): A 12V or 24V to 120V AC pure sine wave inverter for AC appliances. Size the inverter for peak AC load — the starting surge of AC appliances can be 2 to 3 times their running wattage.
- Wire routing on mobile platforms: All DC wiring must be secured at a maximum spacing of 18 inches to prevent vibration fatigue at connector pins. Use marine-grade tinned copper wiring — not standard residential wire — for vibration and moisture resistance.
6. Typical System Sizing for Mobile Applications
| Application | Typical Load | Recommended Solar | Battery | Charge Controller |
| RV — basic (lighting, fans, phone charging) | 30-50 Ah/day | 200-400W (2-4 x 100W panels) | 100-200 Ah LFP | 20-30A MPPT |
| RV — full-time (refrigerator, laptop, TV) | 80-150 Ah/day | 400-800W (2-4 x 200W panels) | 200-400 Ah LFP | 40-60A MPPT |
| Motorhome — residential loads (air conditioning) | 200-400+ Ah/day | 800-2,000W + generator backup | 400-600 Ah LFP + inverter | 60-100A MPPT |
| Polo / utility vehicle (fence energizer, LED lights) | 20-40 Ah/day | 100-200W (1-2 panels) | 50-100 Ah AGM or LFP | 20A MPPT or PWM |
| Equestrian trailer (water pump, lighting) | 15-30 Ah/day | 100-200W | 50-100 Ah AGM or LFP | 20A MPPT |
For the engineering framework governing fixed solar mounting systems — rooftop, ground-mounted, and commercial — see the Solar Mounting Systems hub. For the complete bracket hardware specification for fixed building installations, see the Solar Panel Mounting Brackets guide and the Mounting Brackets for Solar Panels guide.
Frequently Asked Questions for Solar Panel Mount Brackets for RV
What is the best solar panel mount bracket for an RV?
The best solar panel mount bracket depends on the RV roof type and intended use. For most RV installations, low-profile aluminum Z-brackets provide a simple, durable, and cost-effective solution. If the RV remains parked for extended periods, adjustable tilt mounts can improve solar energy production by allowing the panels to face the sun more directly.
Can solar panels be mounted without drilling into an RV roof?
Yes. Some RVs are equipped with roof rails, ladder racks, or factory mounting provisions that allow clamp-on bracket systems to be installed without roof penetrations. However, the mounting system must be rated to withstand vibration, wind loads, and highway travel conditions.
Are Z-brackets strong enough for highway travel?
Yes. Properly installed aluminum or stainless-steel Z-brackets are widely used on RVs, motorhomes, and trailers and are capable of handling normal highway speeds and vibration loads. Fasteners should be installed into structural members and secured using vibration-resistant hardware for long-term reliability.
Should VHB tape be used as the only attachment method?
In most cases, no. VHB tape can provide excellent sealing and vibration damping, but it is generally recommended as a supplemental attachment method rather than the sole structural support. Mechanical fasteners remain the preferred primary attachment method for mobile solar installations exposed to wind, heat, and road vibration.
How often should RV solar mounting bolts be inspected?
A visual inspection should be performed at least every six months and after long-distance travel on rough roads. Fastener torque should be checked after the first 200 miles following installation and periodically thereafter to ensure vibration has not loosened any connections.
Related guides on SolarVisionAI.com
Solar Panel Installation: Complete Engineering Guide
Solar Power System: Types, Cost, ROI & AI Optimization