
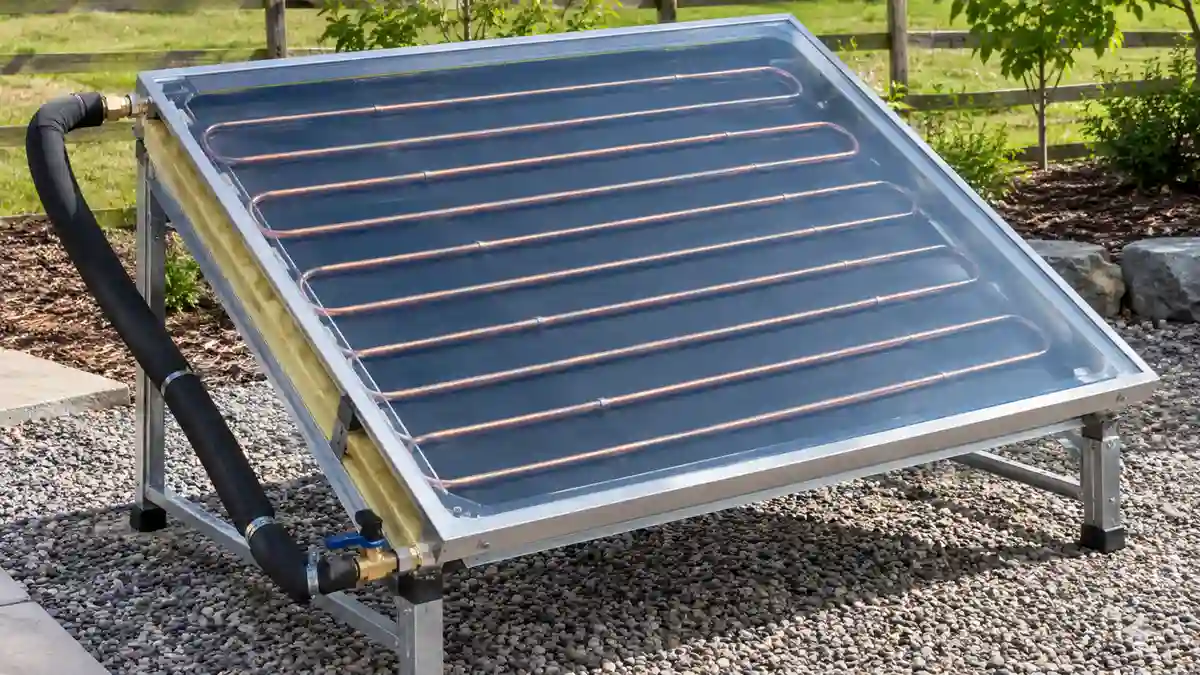
Build a DIY solar water heater with a practical materials list, step-by-step collector guide, heat calculations, performance testing, and essential safety precautions.
A DIY solar water heater is a practical way to explore solar thermal energy, learn how collectors transfer heat, and measure how sunlight can warm water. Unlike photovoltaic (PV) panels, which convert sunlight into electricity, a solar thermal collector captures solar radiation and transfers that heat to a fluid.
For homeowners, students, and renewable-energy enthusiasts, a small do-it-yourself solar hot water heater can be a useful educational project. A basic collector can demonstrate how absorber surfaces, insulation, glazing, water flow, and sunlight affect thermal performance.
However, building a small experimental collector is different from installing a permanent domestic hot-water system. Household systems must account for pressure, scald prevention, water quality, freeze protection, and applicable building and plumbing requirements.
Important Safety Note
This guide covers a small, low-pressure DIY solar water-heating experiment for learning and performance testing. It is not a construction plan for a complete domestic hot-water system. Do not connect a homemade collector directly to household plumbing or use it to supply drinking water.
Permanent domestic installations require appropriately rated equipment, pressure and temperature protection, scald prevention, freeze protection where needed, and compliance with applicable local codes.
Engineer’s Note: When evaluating a DIY solar water heater, do not judge its performance by outlet temperature alone. A small amount of water can reach a high temperature while carrying relatively little useful heat.
Measure the inlet temperature, outlet temperature, and flow rate under reasonably stable sunlight. These measurements provide a more useful estimate of the collector’s thermal output.
For a flowing-water experiment, approximate thermal power can be calculated from the water flow rate and temperature rise. This helps distinguish a collector that produces a high temperature at a very low flow rate from one that transfers more heat to a larger volume of water.
1. How Does a DIY Solar Water Heater Work?
A solar thermal collector absorbs incoming solar radiation and converts it into heat. Water or another suitable heat-transfer fluid moves through tubing attached to or positioned near the absorber, carrying heat away from the collector.
A basic experimental collector typically contains five main elements:
- Absorber surface: A dark, sun-facing surface that absorbs solar radiation.
- Water tubing: A suitable tube or pipe that transfers heat to the moving water.
- Insulation: A layer that reduces heat loss through the back and sides.
- Transparent cover: A glazing layer that allows sunlight to enter while reducing some heat loss.
- Frame and supports: A stable structure that securely holds the collector components.
When sunlight strikes the absorber, its temperature rises. Heat transfers from the absorber into the tubing and then into the water. Insulation reduces unwanted heat loss, while glazing can help the collector retain heat.
Actual performance depends on sunlight intensity, ambient temperature, wind, collector orientation, absorber-to-tube contact, water flow, and construction quality.
2. Choose the Right Type of DIY Solar Water Heater
Before gathering materials, decide what you want the project to demonstrate. Different collector designs have different construction requirements and operating characteristics.
Glazed Flat-Plate Collector
A flat-plate collector generally uses a dark absorber, a network of fluid passages, insulation, and a transparent cover.
For a small educational project, this design demonstrates how absorber area, glazing, insulation, and water flow influence heat transfer. However, building a homemade collector does not automatically make it suitable for domestic hot water or pressurized service.
Unglazed Collector
An unglazed collector has no transparent cover. It is simpler to construct but generally loses more heat to the surrounding air.
Unglazed designs are most useful when the required water-temperature rise is modest and environmental conditions are favorable. Their suitability depends on the application and the temperature difference between the water and the surrounding air.
Batch or Integral Collector
A batch collector warms water held in a dark container exposed to sunlight. It is conceptually simple and useful for observing temperature changes over time.
However, a container heated by sunlight can become extremely hot. A homemade batch collector should be treated as an experimental device, not as a pressurized or potable-water installation.
Active and Passive Systems
An active solar water-heating system uses a pump to move fluid through the collector. A passive system relies on natural circulation or gravity where the design permits.
For an initial DIY experiment, a controlled, low-pressure flow setup can make measurements easier. Do not assume that natural circulation will work reliably without considering elevation, pipe resistance, air pockets, and temperature differences.
3. Materials and Tools
The materials depend on the selected design. For a small, ground-mounted experimental collector, you may need:
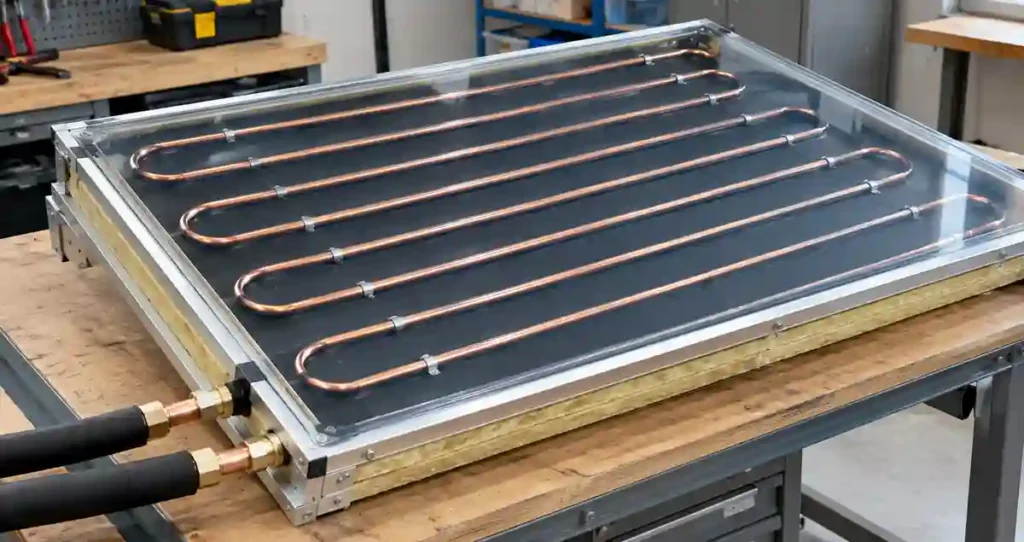
| Component | Purpose |
|---|---|
| Dark absorber plate | Captures solar radiation |
| Compatible tubing | Carries the test water |
| Thermal-contact materials | Improve heat transfer between absorber and tubing |
| Insulation | Reduces heat loss from the rear and sides |
| Transparent cover | Allows sunlight into a glazed collector |
| Stable frame | Supports the collector and its cover |
| Compatible fittings and hoses | Connect the test circuit |
| Temperature probes | Measure inlet and outlet temperatures |
| Flow-measuring container | Helps determine water flow rate |
| Stopwatch | Measures collection time |
| Measuring tape and basic hand tools | Support construction and measurement |
Use materials compatible with the expected temperatures and intended fluid. Tubing, adhesives, seals, and plastic components can soften, degrade, or fail when exposed to prolonged heat or ultraviolet radiation.
Avoid improvised sealed circuits. Do not use components with unknown pressure or temperature ratings in a pressurized installation.
For the first experiment, keep the collector on a stable ground-level support. This avoids many of the risks associated with roof access and roof-mounted equipment.
4. How to Build a Simple DIY Solar Water Heater
The following procedure describes a basic experimental collector. It is intended for observing heat transfer, not for producing a certified household hot-water system.
Step 1: Select a Suitable Location
Choose an outdoor location that receives direct sunlight for a substantial part of the test period. Avoid places shaded by trees, walls, or other equipment.
Position the collector securely and orient it toward the sun. The best orientation and tilt depend on your location, season, and test objective. For a simple experiment, consistent positioning is more important than finding a theoretically perfect angle.
Step 2: Prepare the Absorber
Use a suitable dark absorber plate or purpose-built absorber material. A dark surface generally absorbs more solar radiation than a highly reflective one.
The absorber should be structurally stable and capable of withstanding the expected temperatures. Do not use coatings or materials that release harmful fumes when heated.
Step 3: Attach the Tubing
Arrange compatible tubing so that it makes good thermal contact with the absorber. The aim is to transfer heat efficiently from the absorber into the water.
Poor contact between the tubing and absorber can significantly reduce thermal performance. Mechanical attachment should be secure without crushing the tubing or restricting water flow.
Do not improvise a sealed pressure vessel or connect the test collector to a domestic water line.
Step 4: Add Insulation
Insulate the rear and sides of the collector using suitable temperature-rated materials. Insulation reduces heat loss to the surroundings and helps more of the captured energy reach the water.
Keep insulation away from components that become too hot for the selected material. Follow the material manufacturer’s temperature limitations.
Step 5: Install the Transparent Cover
If using a glazed design, install a suitable transparent cover that allows sunlight to reach the absorber.
The cover should be securely supported and suitable for outdoor exposure. Allow for thermal expansion and avoid creating a dangerously sealed enclosure that could build pressure.
Step 6: Set Up a Low-Pressure Test Circuit
Arrange the tubing, water source, and outlet so that the experiment can operate without creating a sealed, pressurized system.
Use compatible fittings and check for leaks before collecting measurements. Keep the water away from electrical equipment, and do not use the heated water for drinking, cooking, or bathing.
If the design cannot be operated safely without pressurization, do not proceed with an improvised arrangement.
Step 7: Check the Setup Before Testing
Inspect the frame, absorber, tubing, fittings, and cover. Confirm that the collector is stable and that water can move through the tubing without obstruction.
Check that the temperature probes are positioned to measure the water entering and leaving the collector. Secure loose hoses and keep the test area clear.
Step 8: Run the Experiment
Start with a consistent water flow and allow the collector to operate under steady sunlight. Record inlet temperature, outlet temperature, flow rate, ambient conditions, and the time of each measurement.
Avoid touching hot surfaces or handling heated tubing with bare hands. Stop the experiment if a leak, deformation, unexpected pressure, unstable support, or other unsafe condition develops.
5. How to Measure DIY Solar Water Heater Performance
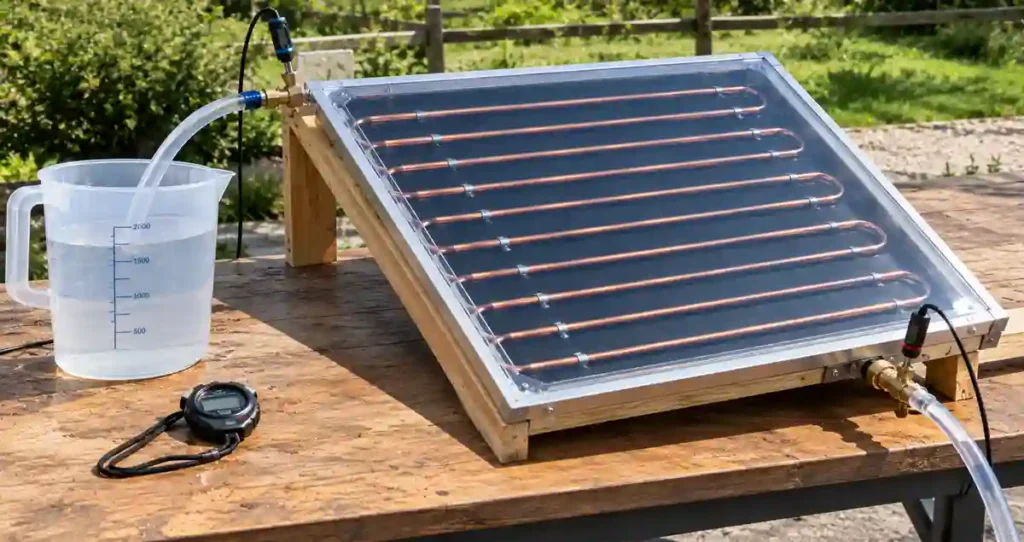
Temperature alone is not enough to determine useful heat output. You should measure both the temperature rise and the amount of water passing through the collector.
Record the following:
- Inlet water temperature
- Outlet water temperature
- Water flow rate
- Ambient air temperature
- Approximate sunlight conditions
- Collector orientation and tilt
- Start time and measurement time
Calculate the Temperature Rise
Temperature rise is the difference between the outlet and inlet water temperatures.
Formula:
Temperature rise = Outlet temperature − Inlet temperature
Example:
- Inlet water temperature = 24°C
- Outlet water temperature = 32°C
Calculation:
Temperature rise = 32°C − 24°C
Temperature rise = 8°C
The water temperature increased by 8°C as it passed through the collector. This measurement alone does not tell you how much heat the collector transferred per second. You also need the water flow rate.
Calculate Approximate Thermal Power
For flowing water, you can estimate the heat transferred to the water using this formula:
Thermal power (kW) ≈ 0.0698 × Flow rate (L/min) × Temperature rise (°C)
Where:
- Thermal power (kW): The approximate rate at which heat is transferred to the water.
- Flow rate (L/min): The volume of water passing through the collector each minute, measured in litres per minute.
- Temperature rise (°C): The outlet temperature minus the inlet temperature.
Worked example
Assume the measured values are:
- Flow rate = 1 litre per minute
- Inlet temperature = 24°C
- Outlet temperature = 32°C
- Temperature rise = 8°C
Step 1: Write the formula.
Thermal power = 0.0698 × Flow rate × Temperature rise
Step 2: Substitute the measurements.
Thermal power = 0.0698 × 1 × 8
Step 3: Calculate the result.
Thermal power = 0.5584 kW
Estimated thermal output ≈ 0.56 kW
This means the collector is transferring heat to the flowing water at an estimated rate of about 0.56 kilowatts under the measured conditions.
This is thermal power, not electrical power generated by a solar panel. It is also not the collector’s efficiency. To calculate efficiency, you would need to compare useful heat output with the solar energy incident on the collector over the same period.
Estimate the Thermal Energy Collected Over Time
Thermal power describes the rate of heat transfer. Thermal energy describes the total heat transferred over a period.
Formula:
Thermal energy (kWh) ≈ Thermal power (kW) × Operating time (hours)
Worked example
Suppose the collector maintains an average thermal output of 0.56 kW for 30 minutes.
Step 1: Convert minutes into hours.
Operating time = 30 ÷ 60
Operating time = 0.5 hours
Step 2: Calculate the energy.
Thermal energy = 0.56 × 0.5
Thermal energy ≈ 0.28 kWh
The collector would transfer approximately 0.28 kWh of thermal energy to the water during that half-hour period, assuming its average output remains close to 0.56 kW.
In real outdoor conditions, output changes with cloud cover, wind, water temperature, and the position of the sun. Repeat measurements and compare results under similar conditions.
For additional unit calculations, use the Watts to Watt-Hours Calculator.
6. How Much Energy Is Needed to Heat Water?
The energy required to heat a batch of water depends on the mass of water and the desired temperature increase.
For water, the approximate specific heat capacity is 4.186 kilojoules per kilogram per degree Celsius. This means that heating 1 kg of water by 1°C requires approximately 4.186 kJ of heat.
To calculate the approximate energy required, use:
Energy required (kWh) = Water mass (kg) × 4.186 × Temperature rise (°C) ÷ 3600
Where:
- Water mass (kg): The mass of water being heated. For ordinary calculations, 1 litre of water can be approximated as 1 kg.
- 4.186: The approximate specific heat capacity of water, in kJ/(kg·°C).
- Temperature rise (°C): The final water temperature minus the initial water temperature.
- 3600: The number of kilojoules in one kilowatt-hour.
Worked Example: Heating 10 Litres of Water
Suppose you want to heat 10 litres of water from 25°C to 35°C.
Step 1: Determine the water mass.
Water mass ≈ 10 litres × 1 kg/litre
Water mass ≈ 10 kg
Step 2: Calculate the temperature rise.
Temperature rise = 35°C − 25°C
Temperature rise = 10°C
Step 3: Apply the formula.
Energy required = 10 × 4.186 × 10 ÷ 3600
Step 4: Calculate the result.
Energy required = 418.6 ÷ 3600
Energy required ≈ 0.116 kWh
Therefore, approximately 0.116 kWh of thermal energy is needed to raise the temperature of 10 litres of water by 10°C under ideal conditions.
This is the heat absorbed by the water itself. A real solar collector must capture more energy because some heat is lost through the collector, tubing, and surrounding air.
How Long Would the Collector Take?
Using the earlier example, suppose the collector transfers heat to the water at an average rate of 0.56 kW.
The theoretical heating time can be estimated as:
Heating time (hours) = Energy required (kWh) ÷ Thermal power (kW)
Substitute the values:
Heating time = 0.116 ÷ 0.56
Heating time ≈ 0.207 hours
Convert hours into minutes:
Heating time = 0.207 × 60
Theoretical heating time ≈ 12.4 minutes
This is an idealized estimate. It assumes that the collector maintains 0.56 kW of thermal output and that all of that output contributes to heating the target water. Actual heating time may be longer because of heat losses, changing sunlight, and variations in flow and temperature.
A small collector may produce a noticeable temperature increase in a limited volume of water but may not deliver enough energy to meet a household’s daily hot-water demand. A larger collector can collect more energy, but its output still depends on weather, design, installation, and system losses.
7. What Affects Solar Water Heater Efficiency?
Several factors determine whether a DIY solar hot water heater transfers heat effectively.
Solar Irradiance
Stronger sunlight generally increases the energy available to the absorber. Cloud cover, shade, season, and time of day affect the energy reaching the collector.
Absorber-to-Tube Contact
Good thermal contact reduces resistance between the absorber and the water-carrying tubing. Gaps or poor attachment can limit heat transfer.
Insulation Quality
Insulation reduces heat lost from the rear and sides. Wind can increase heat loss, especially in an unglazed collector.
Water Flow Rate
A higher flow rate can reduce the temperature rise per pass while increasing the amount of water being heated. A lower flow rate may produce a larger temperature rise but transfer less total heat per minute.
The appropriate flow depends on collector design and test conditions. Compare thermal output rather than assuming the highest outlet temperature means the best performance.
Collector Area and Orientation
A larger absorber can intercept more sunlight, assuming other factors remain comparable. Orientation and tilt influence how much solar radiation reaches the collector.
Temperature Difference
Heat losses generally increase as the collector becomes hotter than its surroundings. As a result, performance can decline when trying to achieve a large temperature rise in cold or windy weather.
8. DIY Solar Water Heater vs. a Commercial System
A homemade collector and a certified domestic solar water-heating system serve different purposes.
| Feature | DIY experimental collector | Commercial domestic system |
|---|---|---|
| Main purpose | Learning and performance testing | Supplying hot water for a defined application |
| Components | Selected and assembled by the builder | Designed and rated for the intended system |
| Pressure protection | Must not be assumed | Provided as part of an appropriately designed system |
| Water quality | Test water only; not for drinking or bathing | Designed according to applicable potable-water requirements |
| Freeze protection | May be absent | Addressed where required by climate and system design |
| Performance documentation | Measured by the experimenter | May have manufacturer data and recognized certification |
| Installation compliance | Depends on the project and location | Must comply with applicable local requirements |
A DIY collector can be useful for understanding thermal energy and comparing materials. It should not be treated as a substitute for a properly designed domestic system merely because it can heat water.
If your goal is household hot water, choose equipment designed for that use and have the installation evaluated against applicable plumbing, mechanical, and building requirements.
9. Safety Considerations Before Building
Solar-heated water can cause burns, and collector components may reach temperatures higher than expected. Treat safety as part of the design rather than as an afterthought.
Pressure and Thermal Expansion
Do not seal water inside an improvised collector or allow heating to create an uncontrolled pressure buildup. Water expands when heated, and trapped water or vapor can create a serious hazard.
A permanent system must use components and protection devices suitable for its operating pressure and temperature.
Scald Prevention
Hot water can cause serious burns. Never assume that water from a homemade collector is safe for direct use. A domestic system requires appropriate temperature control and scald protection.
Potable Water
Do not use water from an experimental collector for drinking, cooking, or bathing. Materials, seals, coatings, and tubing may not be approved for potable-water service.
Electrical Safety
If a pump, controller, or sensor requires electricity, keep electrical connections protected from water and outdoor exposure. Use appropriately rated equipment and required electrical protection. Do not work on energized equipment in wet conditions.
Freeze Protection
Water left in tubing can freeze and expand, damaging the collector or its fittings. In climates where freezing is possible, a permanent installation needs a suitable freeze-protection strategy. Draining an experimental circuit may reduce freeze risk, but only if the design can drain completely.
Structural and Fire Safety
Use a stable frame and suitable materials. Keep the collector away from combustible materials where temperatures could become excessive. Avoid roof installations unless the structure, mounting, weatherproofing, and safe access have been properly evaluated.
10. Codes and Standards to Consider
In the United States, the relevant requirements depend on the system type, project location, adopted code editions, and authority having jurisdiction. A small educational experiment may be treated differently from a permanent domestic hot-water installation.
Depending on the project, relevant references may include:
- International Residential Code (IRC), Section M2301: Solar thermal energy systems in residential construction, where applicable.
- International Mechanical Code (IMC), Chapter 14: Solar systems, where applicable.
- International Plumbing Code (IPC): Plumbing installation and water-system requirements, where adopted.
- NFPA 70, National Electrical Code: Electrical requirements for pumps, controls, and associated equipment, where applicable.
- ICC 900/SRCC 300: Solar thermal system standard.
- ICC 901/SRCC 100: Solar thermal collector standard.
These references should not be interpreted as proof that a homemade collector complies with applicable requirements. Confirm the adopted editions and local rules before installing any permanent system. Other countries and jurisdictions have their own applicable regulations and standards.
11. Troubleshooting a DIY Solar Water Heater
If your collector does not perform as expected, investigate one variable at a time.
Low temperature rise: Check sunlight, shade, flow rate, absorber contact, insulation, and measurement accuracy. A low temperature rise may be normal at a higher flow rate.
High outlet temperature but little useful output: Measure flow rate. A very small flow can produce a large temperature difference without transferring much total heat.
Large changes between readings: Record cloud cover, wind, and time of day. Check that the inlet and outlet probes are positioned consistently and are measuring the water rather than the tubing or absorber surface.
Water leaks: Stop the test and allow hot components to cool before inspecting the circuit. Replace unsuitable or damaged fittings rather than trying to make an improvised pressure system work.
Poor performance in windy conditions: Wind increases heat loss, particularly in unglazed collectors. Check the insulation and glazing arrangement without obstructing safe drainage or creating a pressure hazard.
Collector becomes excessively hot: Stop the experiment if the tubing, seals, frame, or cover approaches its temperature limit. Do not assume that a higher collector temperature is always beneficial.
12. Frequently Asked Questions
Can I build a DIY solar water heater at home?
Yes. A small, ground-mounted collector can be built for educational purposes using suitable materials. The design must remain within the temperature, pressure, and material limits of its components. A homemade experimental collector should not be connected directly to household plumbing.
What is the easiest type of solar water heater to build?
A simple batch-style experiment or a small glazed collector can help demonstrate solar thermal heating. The easiest design depends on the materials, tools, and measurement goals. Simplicity does not eliminate the risks of hot water, trapped pressure, or unsuitable materials.
Does a DIY solar water heater work on cloudy days?
It can collect some diffuse solar energy, but output generally falls when less sunlight reaches the collector. The amount of useful heat depends on cloud cover, ambient conditions, collector design, and water temperature.
Can a DIY solar water heater provide hot water for a house?
A small homemade collector should not be assumed suitable for domestic hot water. A household installation requires equipment and system protection designed for the intended water demand, operating pressure, temperature, water quality, climate, and local codes.
Is a black hose enough to make a solar water heater?
A dark hose exposed to sunlight can warm the water inside it, but the result depends on the hose material, length, flow rate, weather, and heat losses. A dark hose is not automatically a safe or durable domestic hot-water system. Check its temperature rating and intended use.
How do I calculate the output of a DIY solar water heater?
Measure the water flow rate and the difference between outlet and inlet temperatures.
Thermal power (kW) ≈ 0.0698 × Flow rate (L/min) × Temperature rise (°C)
For example, a flow rate of 1 L/min and a temperature rise of 8°C gives an estimated thermal output of 0.56 kW.
This estimates heat transferred to the water under the measured conditions. It does not calculate collector efficiency unless the available solar energy and collector area are also known.
Does a DIY solar water heater need a pump?
Not always. Some systems rely on natural circulation, while others use a pump. Natural circulation depends on the arrangement of the collector, tank, pipework, and elevation. A pump-based experimental circuit can make flow measurement easier, but electrical and water safety must be addressed.
Can I use a homemade solar water heater for a swimming pool?
A pool-heating project has different requirements from a domestic hot-water system. Pool-water chemistry, flow, materials, pump compatibility, and system design all matter. See our guide to a solar water heater for a pool and the related explanation of how a solar water heater is connected to a pool.
Final Engineering Takeaway
A DIY solar water heater is a useful way to understand how sunlight becomes thermal energy. A well-planned experiment can demonstrate the effects of absorber design, insulation, water flow, and environmental conditions.
Measure inlet temperature, outlet temperature, and flow rate instead of relying on outlet temperature alone. Use the results to estimate useful thermal output and compare designs under similar conditions.
Most importantly, keep an experimental collector separate from a permanent domestic hot-water installation. Household systems require appropriately rated components, pressure and temperature protection, scald prevention, freeze protection where needed, and compliance with local requirements.
For SolarVisionAI readers, the goal is not simply to make water hot. It is to understand how the system performs, measure the energy transferred, and recognize the engineering requirements for using solar thermal technology safely.
References and Further Reading
- U.S. Department of Energy — Solar Water Heaters
- ENERGY STAR
- Pacific Northwest National Laboratory
- International Code Council
- NFPA — National Electrical Code resources
Always confirm the current code edition, local requirements, and suitability of materials before building or installing a permanent solar water-heating system.
Related guides
- How Is Solar Water Heater Connected to a Pool?
- Solar Livestock Water Heater: Options for Farms
- Solar Water Heater for Horse Troughs: A Livestock Owner’s Guide
- Solar Blanket Reels and Covers: Do They Heat Water?
- Solar Blanket: Types, Uses and How They Work.
- Solar Water Heater for Pool: Types, Sizing and Cost
- Solar Water Heater for Above Ground Pool: Sizing & Setup
Related guides on SolarVisionAI.com
- Monocrystalline Solar Panels 2026: Still Worth It or Hype
- Polycrystalline Solar Panels: Worth Buying in 2026?
- Thin-film Solar Panels: When They Beat Silicon (2026)
- BIPV Solar Panels: Building-Integrated PV Complete Guide
- Portable Solar Panels: Engineer’s Buyer’s Guide 2026
- CPV Solar Panels: Concentrated Photovoltaic Explained
- Skin Solar Panel: What “Solar Skin” Actually Means
- Solar Fence Post Lights: Cap Sizes, Types & Install Guide
- Bifacial Solar Panels in 2026: How to Boost Energy Output
- Solar Charge Controller: The Complete Guide
- MC4 Connectors: Solar Safety & Installation Guide
- Solar Panel Types, Efficiency & Benefits
- Solar Water Pump Guide
- Commercial Solar Panel Installation: Engineering Guide
- Solar Fence Post Lights: Cap Sizes, Types & Install Guide
- BESS — Battery Energy Storage System Guide
- Commercial Solar Panel Installation
- Solar Refrigerator & DC Fridge — Complete 2026 Guide
- Bifacial Solar Panel Albedo Effect Guide
- TOPCon: Why TOPCon Solar Panel is a Proven Smart Investment in 2026
- HJT: Why TOPCon Solar Panel is a Proven Smart Investment in 2026
- PERC: PERC Solar Panel: Still Relevant or Already Outdated?
- Perovskite: Perovskite Solar Panels: The 2026 Reality Check
- N-Type vs P-Type: N-Type vs P-Type Solar Panels: Honest Comparison
- ABC: ABC (all back contact) Solar Panel: Back Contact Technology Explained
- IBC: IBC Solar Panels: Interdigitated Back Contact Guide
- Tandem: Tandem Solar Panels: Are Stacked Cells Ready for Rooftops?